Showing posts with label bhyve. Show all posts

Saturday, June 13, 2026

Using QEMU Guest Agent with bhyve

I assume readers of the blog post are already familiar with FreeBSD and its bhyve hypervisor. Some might not be familiar with the qemu guest agent. Briefly, it's a process running within the guest which allows communicating between the hypervisor and the guest. It allows both querying information, such as disks, filesystems, network interfaces and a lot more. It also allows to manage guests, for example triggering a graceful reboot or shutdown, setting time, updating SSH keys and so forth.

Here's an overview on how to use the qemu guest agent on a FreeBSD guest running on a FreeBSD host with bhyve.

Host (bhyve) configuration

On the bhyve side, it needs to be started like that:

bhyve -c 4 -m 4096 -S -A -I -u -H -P \
   -s 0:0,hostbridge -l bootrom,/usr/local/share/uefi-firmware/BHYVE_UEFI.fd \
   -s 1:0,lpc \
   -s 2:0,virtio-console,org.qemu.guest_agent.0=/var/run/bhyve/bhyve.agent \
   -s 3:0,virtio-net,tap1 \
   -s 4:0,virtio-blk,/var/img/disk-freebsd.img \
   -l com1,stdio \
   freebsd

Here, the most important part for us is -s 2:0,virtio-console,org.qemu.guest_agent.0=/var/run/bhyve/bhyve.agent. This connects the org.qemu.guest_agent.0 to the /var/run/bhyve/bhyve.agent UNIX socket. It is not needed to create this socket manually, but it needs to be removed manually when the VM is destroyed.

Guest configuration

Install the qemu-guest-agent package:

# pkg install qemu-guest-agent

Enable it to start automatically on boot:

# sysrc qemu_guest_agent_enable="YES"
And also start it right away so we don't have to wait for the next reboot:
service qemu-guest-agent start

Testing

To test if the agent is actually working, run the following on the host:

echo '{"execute":"guest-get-host-name"}' | sudo nc -U /var/run/bhyve/bhyve.agent

That queries the guest's hostname. Now you should see a response similar to:

{"return": {"host-name": "freebsd"}}

And that's it, it's just that simple! If you want to use the guest agent manually or build something on top of it, please refer to the QEMU Guest Agent Protocol Reference.

Thanks for reading!

Saturday, February 21, 2026

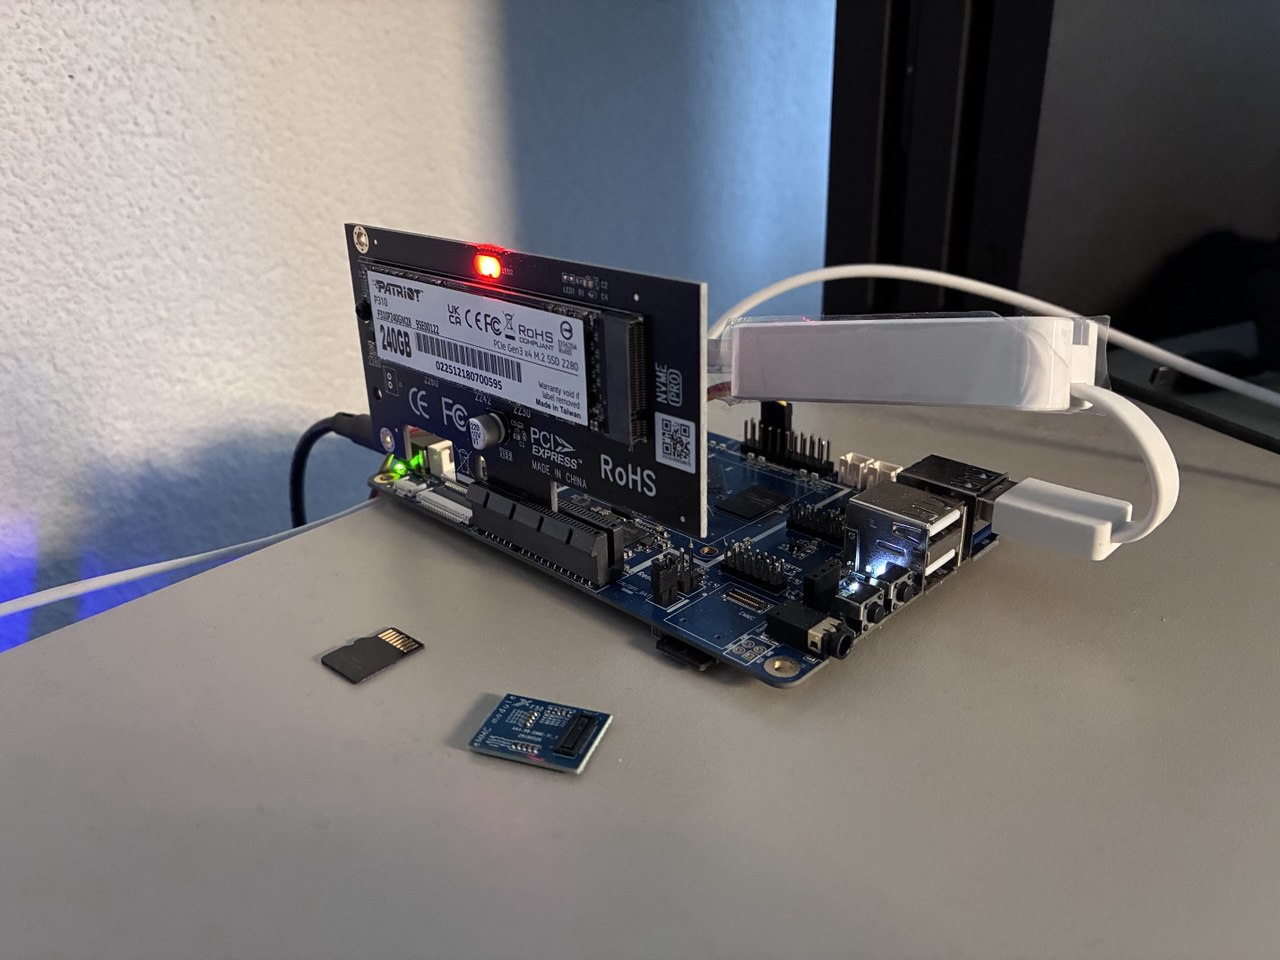
Running FreeBSD (and bhyve!) on Pine Quartz64 Model A

I needed a cheap solution to run bhyve on FreeBSD/arm64. After some research, I decided to try the Quartz64 Model A board.

Requirements for bhyve on arm64 as per vmm(4) are:


     •   arm64: The boot CPU must start in EL2 and the system must have a
         GICv3 interrupt controller.  VHE support will be used if available.

The Quartz64 board satisfies these requirements, so I decided to give it a shot.

FreeBSD installation with u-boot

The FreeBSD Wiki page for Rockchip recommends using the RockPro64 image and using the loader from the sysutils/u-boot-quartz64-a port. It is also possible to use a UEFI-based installation, which I will cover later. I downloaded the latest CURRENT snapshot image for RockPro64 and flashed it to a USB memstick. Then I installed sysutils/u-boot-quartz64-a and flashed the loader to an SD card. I think it's possible to flash everything to the same media, but it's easier for me to have a working loader on the SD card while I experiment with the main OS on the USB memory stick.

The next step is to prepare a USB serial console. I bought one from Pine. Wiring is fairly simple, but do not forget to switch RX/TX.

To connect to the console I used:

sudo minicom -D /dev/cuaU0 -b 1500000

It should be enough to get started.

Issues

I have encountered some issues and limitations. Specifically:

  • The eqos NIC driver detects the device, but fails to attach. Solved by using an external RTL8153 based USB adapter.
  • bhyve(8) might not work if you run a FreeBSD version which does not include this commit.
  • NVMe/PCI does not work.

FWIW, this list is accurate for FreeBSD 16.0-CURRENT as of early/mid Feb 2026.

Not being able to use NVMe was a major deal breaker for me as it's not possible to get decent I/O rates without it, so I decided to test the UEFI approach.

FreeBSD installation with UEFI

For this setup, I kept my original memstick I used together with the u-boot SD card. Then I replaced the u-boot SD card with another one on which I flashed Quartz64 UEFI.

The console setup for it is somewhat different, so I used: cu -s 115200 -l /dev/ttyU0 to connect to it. Another detail: it allows you to enter the configuration menu before booting and choose one of UEFI, UEFI+devicetree, or devicetree modes. I'm using the UEFI mode.

The rest is fairly similar to the u-boot option.

What's different? The main difference for me is that NVMe finally works. Bhyve also works. However, there are some limitations, specifically:

  • Built-in devices are not detected without a device tree. That means no eMMC, no NIC, and maybe others.

I decided to settle on the UEFI option because I have an external USB NIC anyway, and NVMe is more important than eMMC to me. And bhyve works fine in this mode.

Here is how it looks now:

And the dmesg.

Sunday, January 4, 2026

Running bhyve Virtual Machines in a Jail

A couple of months ago I briefly described a libvirt CI setup that I run to make sure libvirt/bhyve keeps working.

One thing I'd like to cover in more depth is running bhyve in a jail. Why is that needed in the first place? My primary motivation was separating the host's libvirt instance from the one being tested. It also helps ensure that the host configuration and packages do not interfere with the ones being tested. I imagine, however, that there could be more cases where running bhyve in a jail makes sense, for example as an additional security measure.

I use Bastille to manage my jails, but the concept is the same for plain jails and probably other jail management software as well.

The settings I have in my Bastillefile are as follows. Some of these are not strictly required to run bhyve(8), but may be necessary to run libvirt, pf, and related tools. It is up to the reader to trim down anything that seems unnecessary.

CONFIG set allow.chflags=1;
CONFIG set allow.raw_sockets=1;

CONFIG set allow.vmm=1;
CONFIG set allow.mount;
CONFIG set allow.mount.devfs;
CONFIG set allow.mount.fdescfs;
CONFIG set allow.mount.procfs;
CONFIG set mount.devfs;
CONFIG set mount.fdescfs;
CONFIG set mount.procfs;
CONFIG set devfs_ruleset="44";

/etc/devfs.rules looks like this:

[devfs_rules_bhyve_jail=44]
add include $devfsrules_jail
add path vmm unhide
add path vmm/* unhide
add path tap* unhide
add path mem unhide
add path kmem unhide
add path nmdm* unhide
add path pci unhide
add path io unhide
add path pf unhide

As you can see, this also includes some extra stuff, such as pf, which you are of course free to remove or adjust to your liking.

And that's it -- this should be enough to get you started with running bhyve(8) in jail(8).

Saturday, September 20, 2025

Tutorial: managing bhyve virtual machines using virt-manager

The goal of this tutorial is to help you get started with virt-manager on FreeBSD for managing bhyve VMs. We’ll go through installation and basic configuration, and then set up a FreeBSD guest.

Installation

To install virt-manager, run:

# pkg install virt-manager

This will also pull in libvirt as a dependency.

Configuration

Edit /etc/rc.conf and add:

libvirtd_enable="YES"

You can validate your setup by running:

# virt-host-validate
 BHYVE: Checking for vmm module                                              : PASS
 BHYVE: Checking for if_tap module                                           : WARN (if_tap module is not loaded, networking will not work)
 BHYVE: Checking for if_bridge module                                        : PASS
 BHYVE: Checking for nmdm module                                             : PASS
#

The if_tap warning isn’t critical if it’s compiled into your kernel.

Next, adjust libvirt’s control socket permissions. Edit /usr/local/etc/libvirt/libvirtd.conf and add:

unix_sock_group = "wheel"
unix_sock_rw_perms = "0770"

The last prep step is to add a default network:

# cp /usr/local/share/examples/libvirt/networks/default.xml /usr/local/etc/libvirt/qemu/networks
# ln -s ../default.xml /usr/local/etc/libvirt/qemu/networks/autostart/default.xml

Now start libvirtd:

# service libvirtd start
Starting libvirtd.
#

And then start virt-manager:

$ virt-manager

Creating a VM

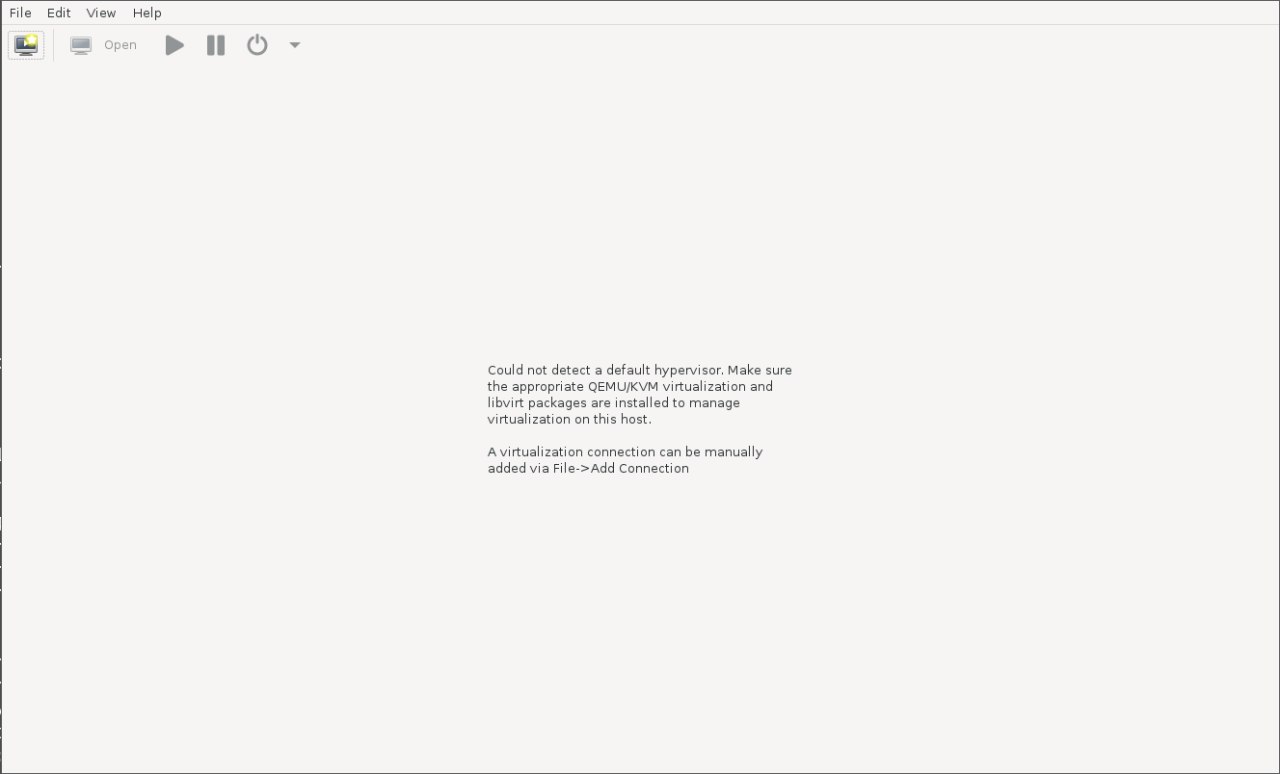
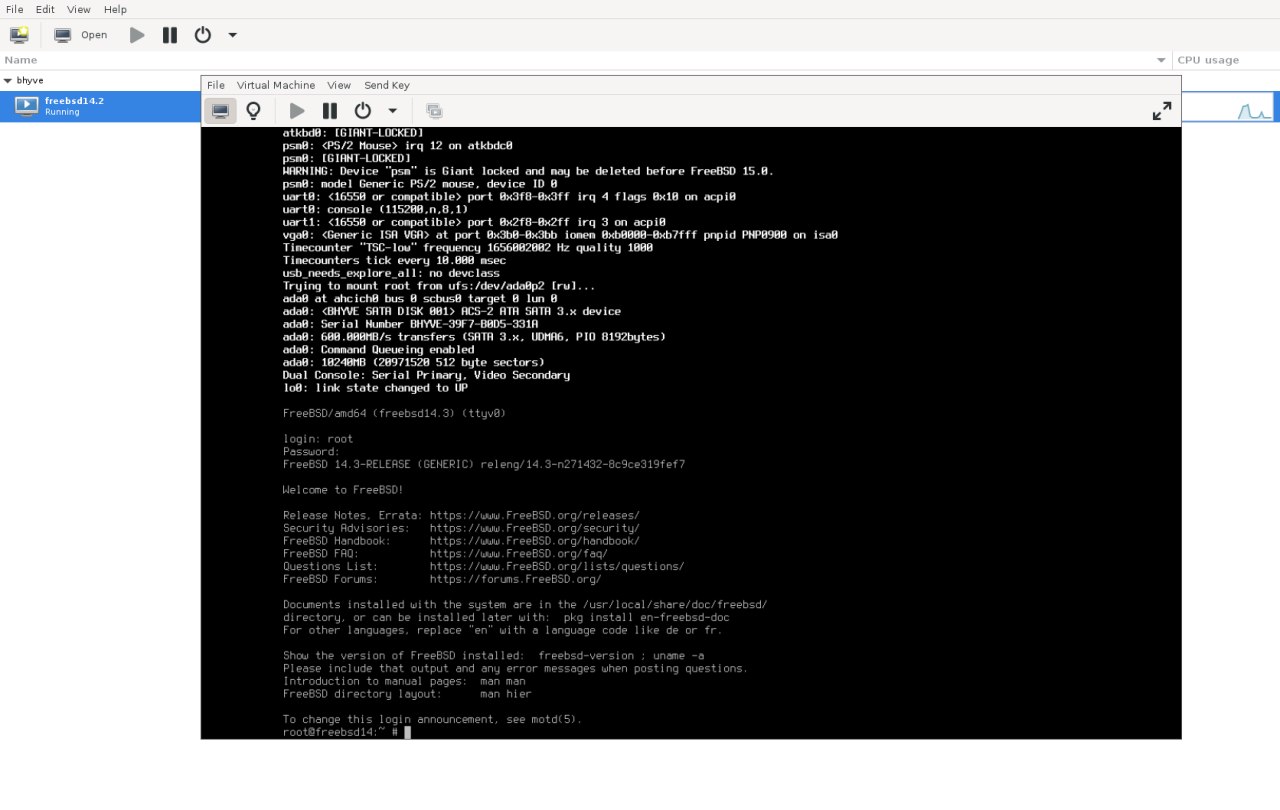
virt-manager initial screen

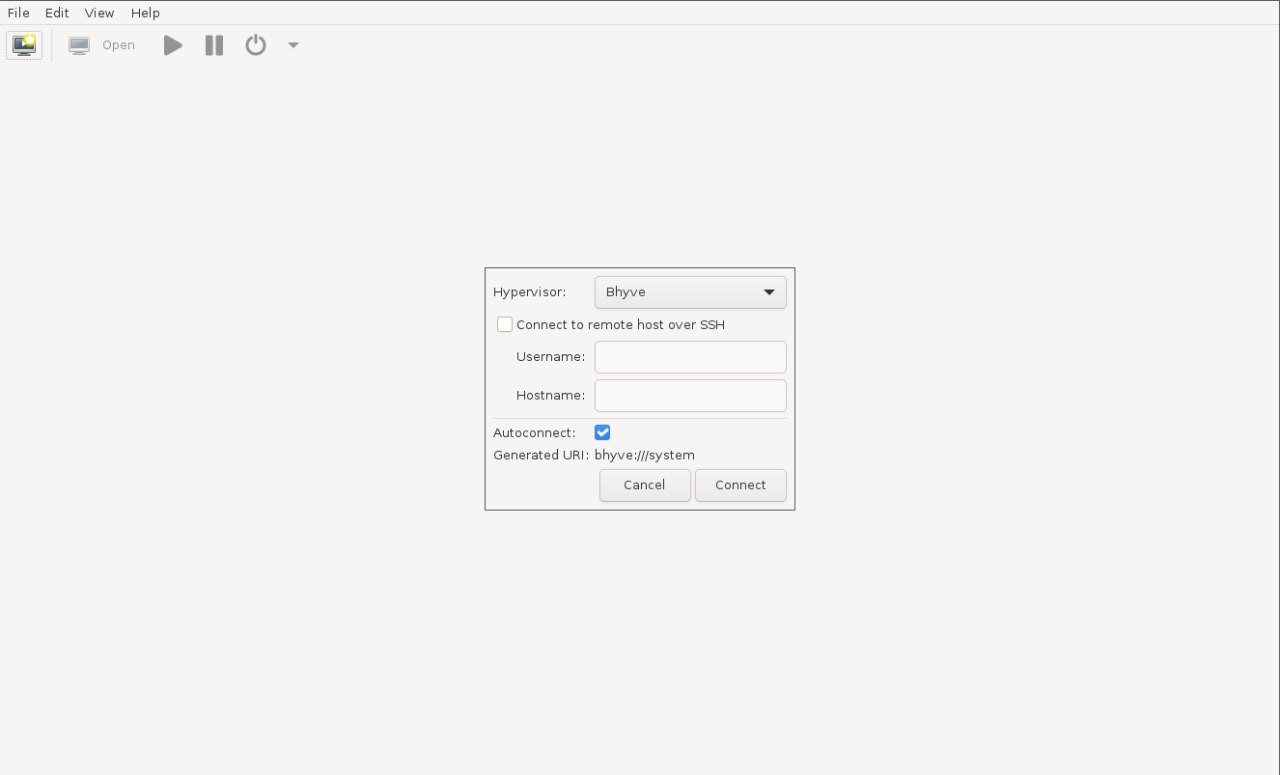
Go to "File" → "Add Connection", choose bhyve:

Add Connection screen

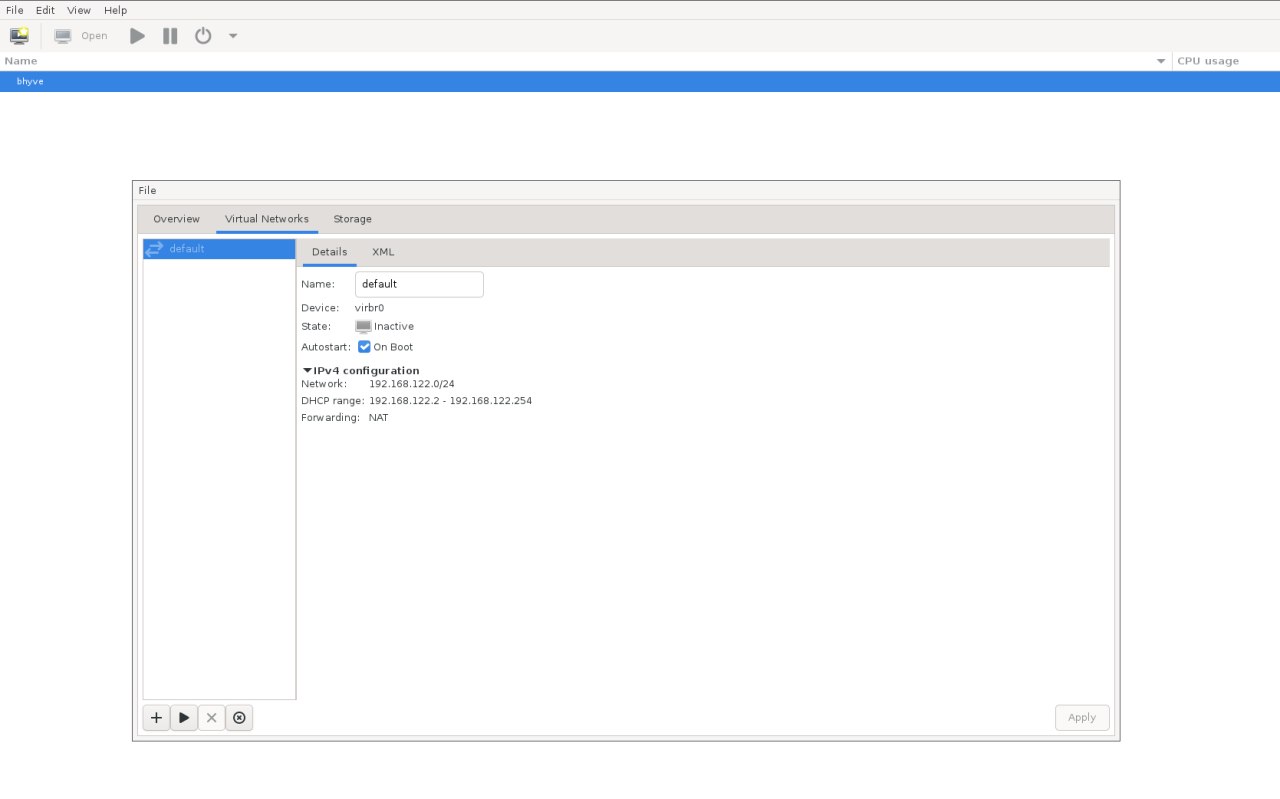
Click "bhyve", then open the "Virtual Networks" tab. You should see the default network listed:

Virtual network dialog

Press the "Play" button to start it.

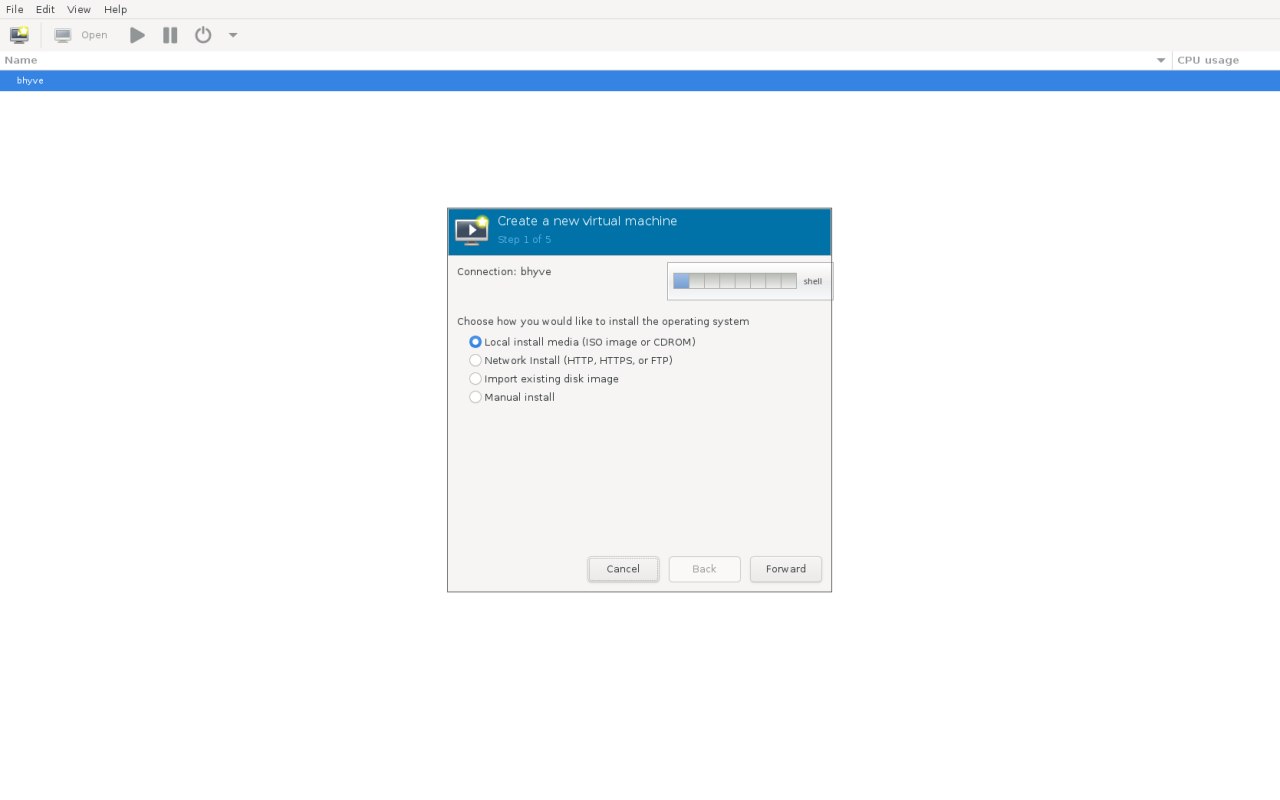
Now create a new VM: "File" → "New Virtual Machine".

VM install dialog

Choose "Local install media" → "Forward". Then click "Browse" to select an ISO.

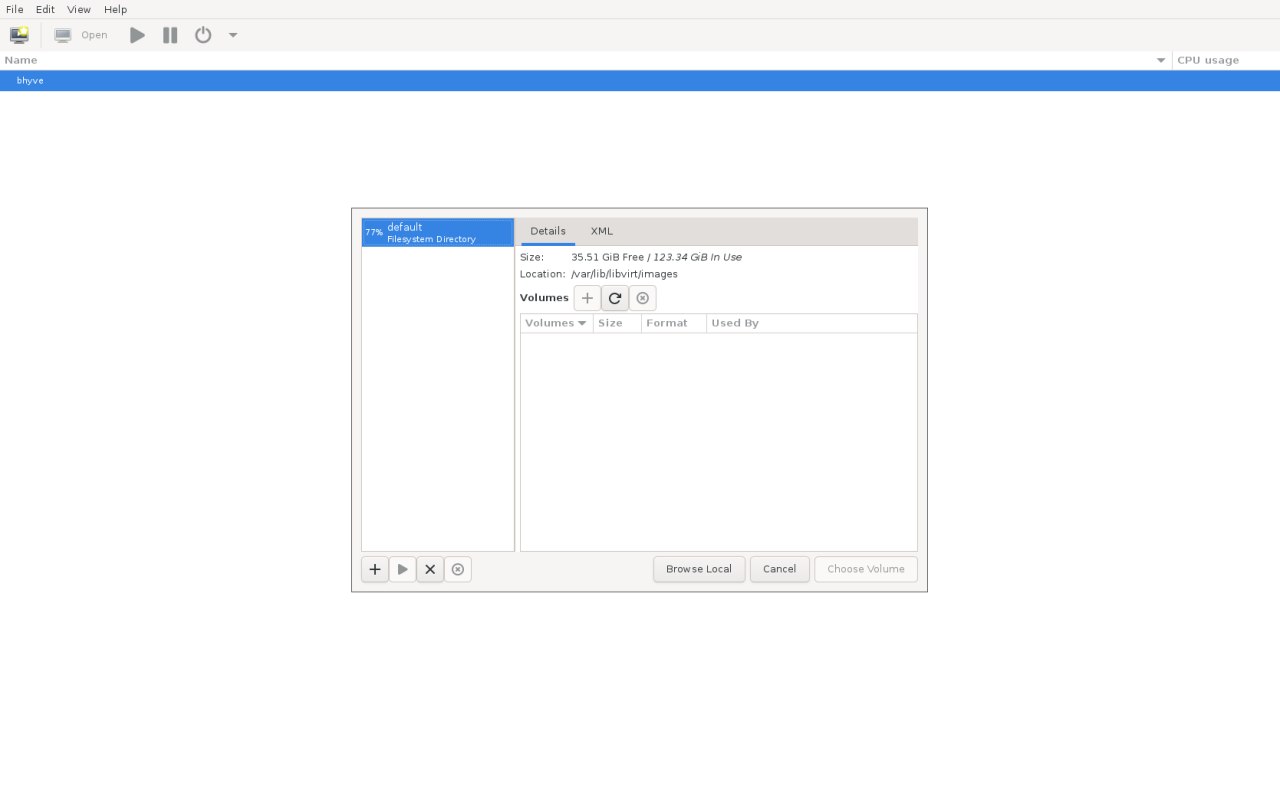
VM storage dialog

By default it shows /var/lib/libvirt/images, but you can pick an ISO from your home directory with "Browse Local".

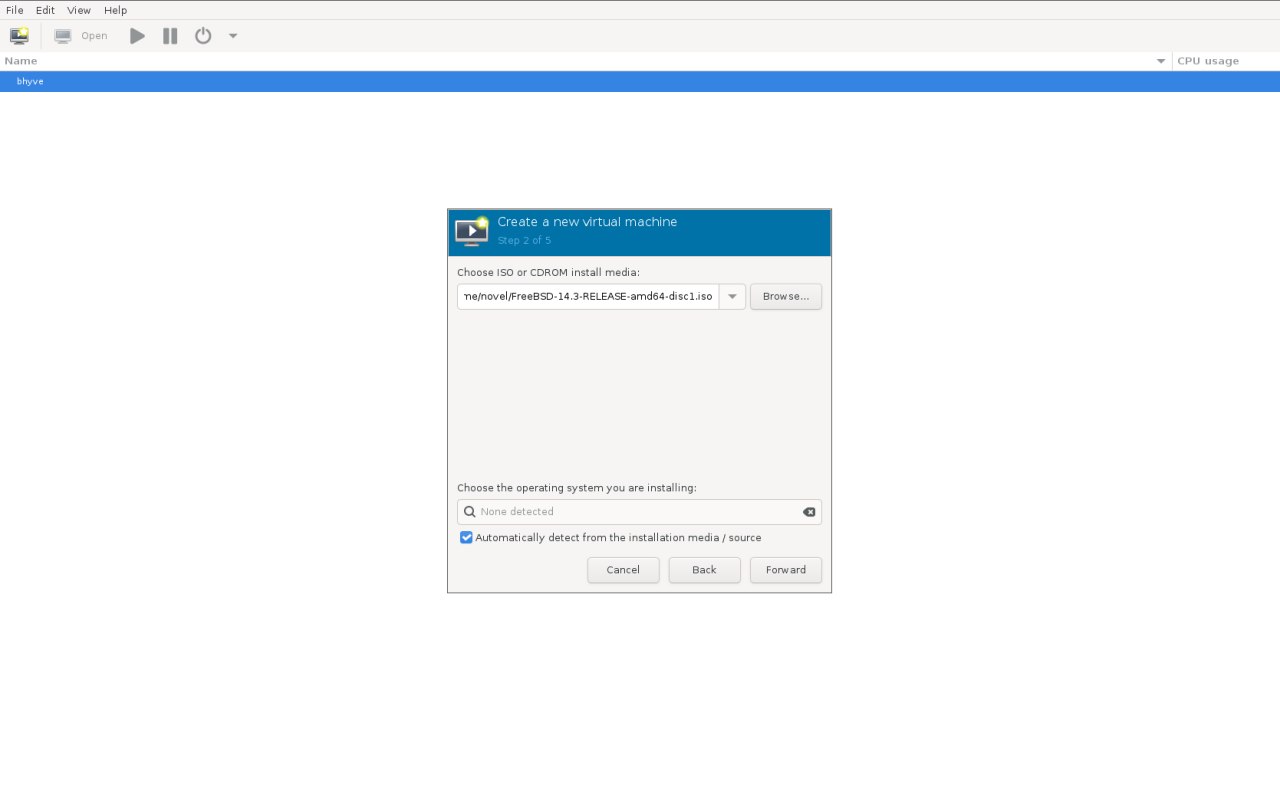
VM choosing local media

Uncheck "Automatically detect from the installation media / source", search for "FreeBSD", and select "FreeBSD 14.2". (The auto-detection is buggy right now.)

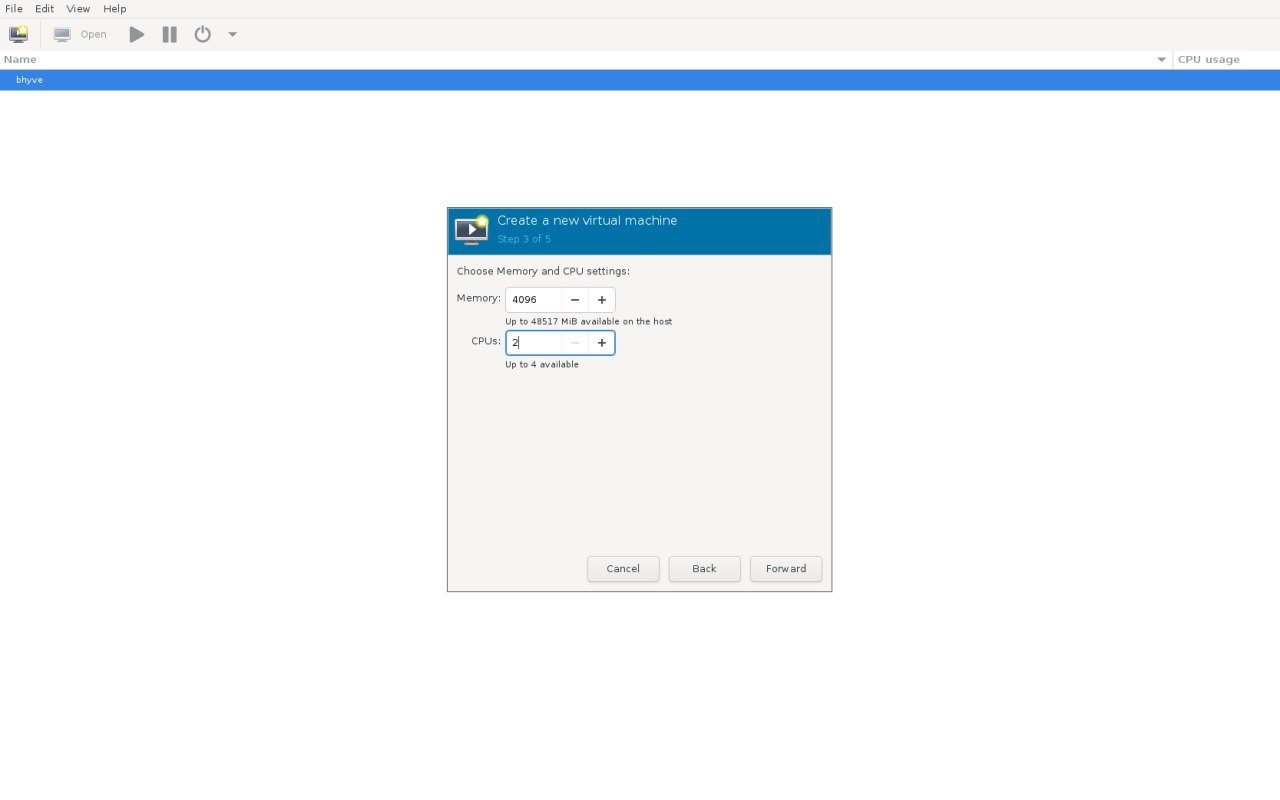
The next step is CPU and memory setup — straightforward.

RAM and CPU dialog

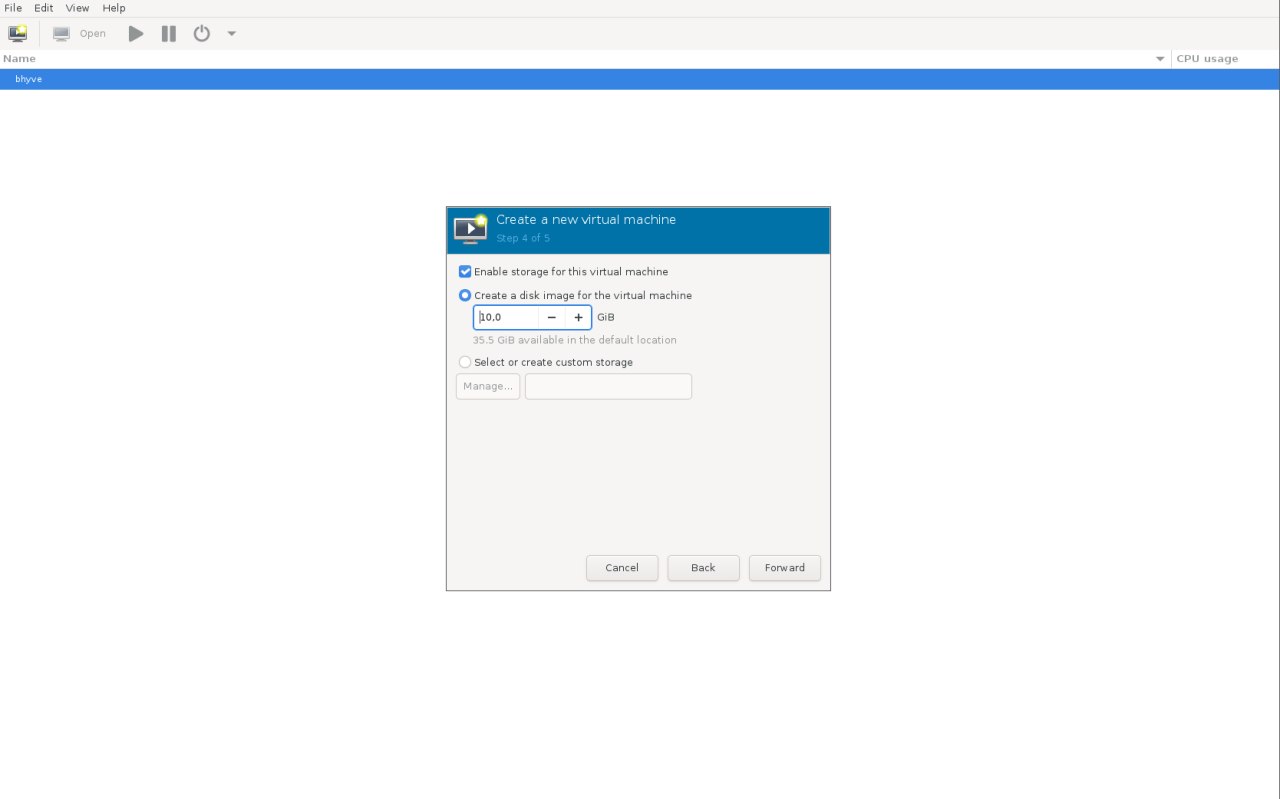
Then configure storage:

VM storage configuration

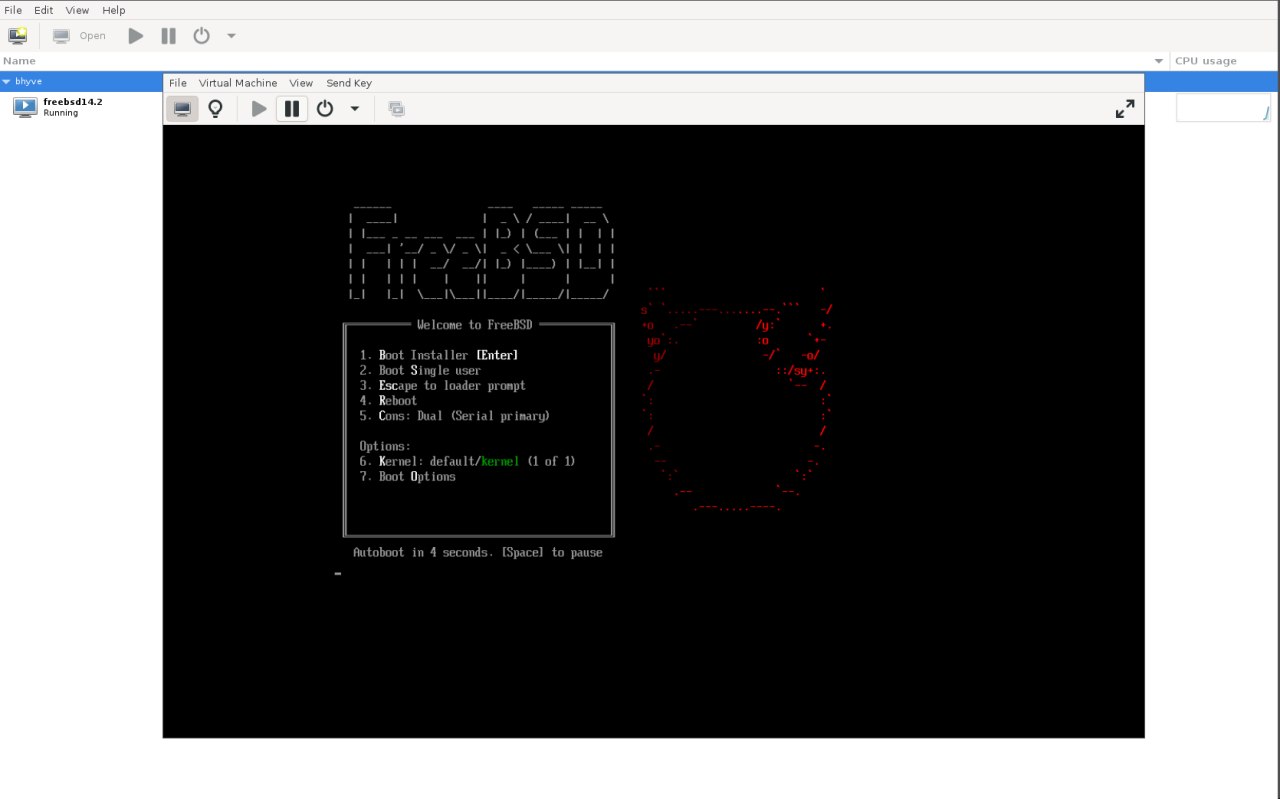
If everything’s correct, you’ll see the FreeBSD installer:

Installer

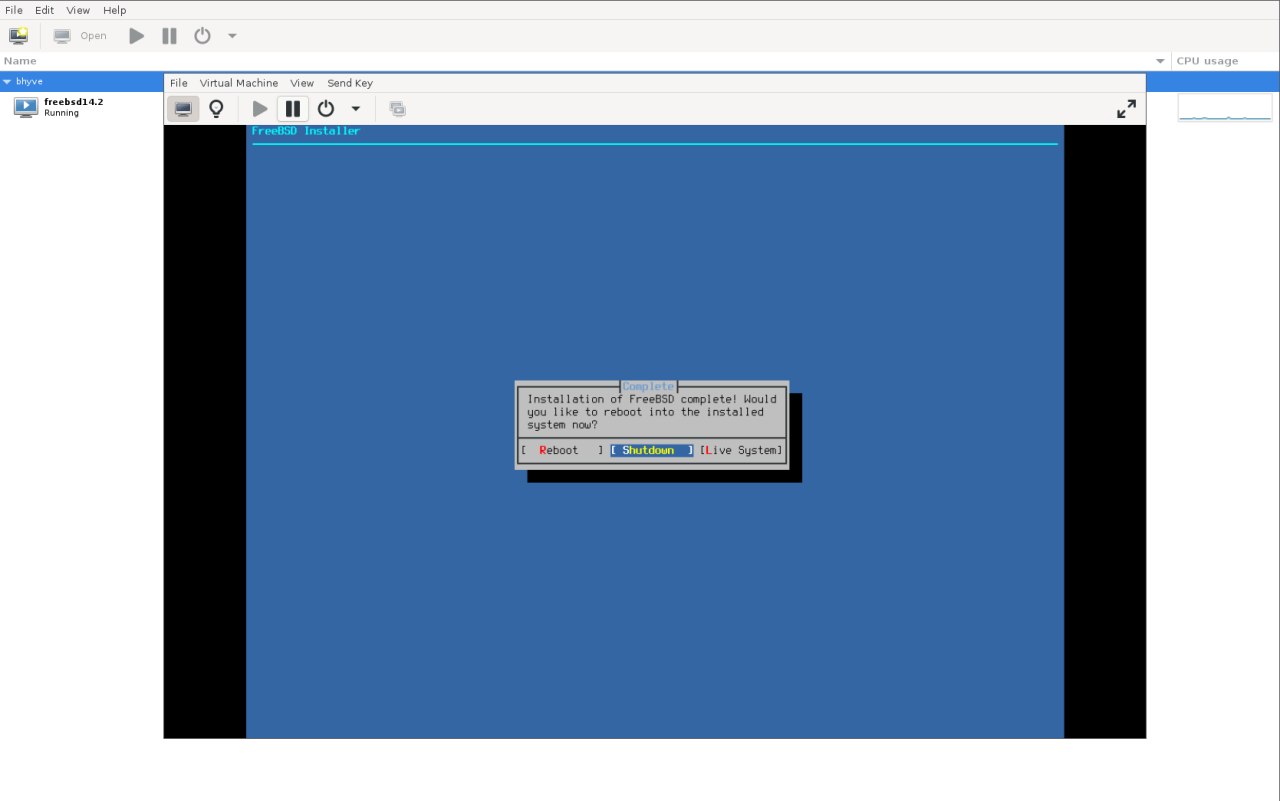
I’ll let you handle the installation itself. The only important bit: at the end, make sure you shut the VM down. Boot order isn’t supported yet, so you don’t want to boot from the ISO again.

Installation complete

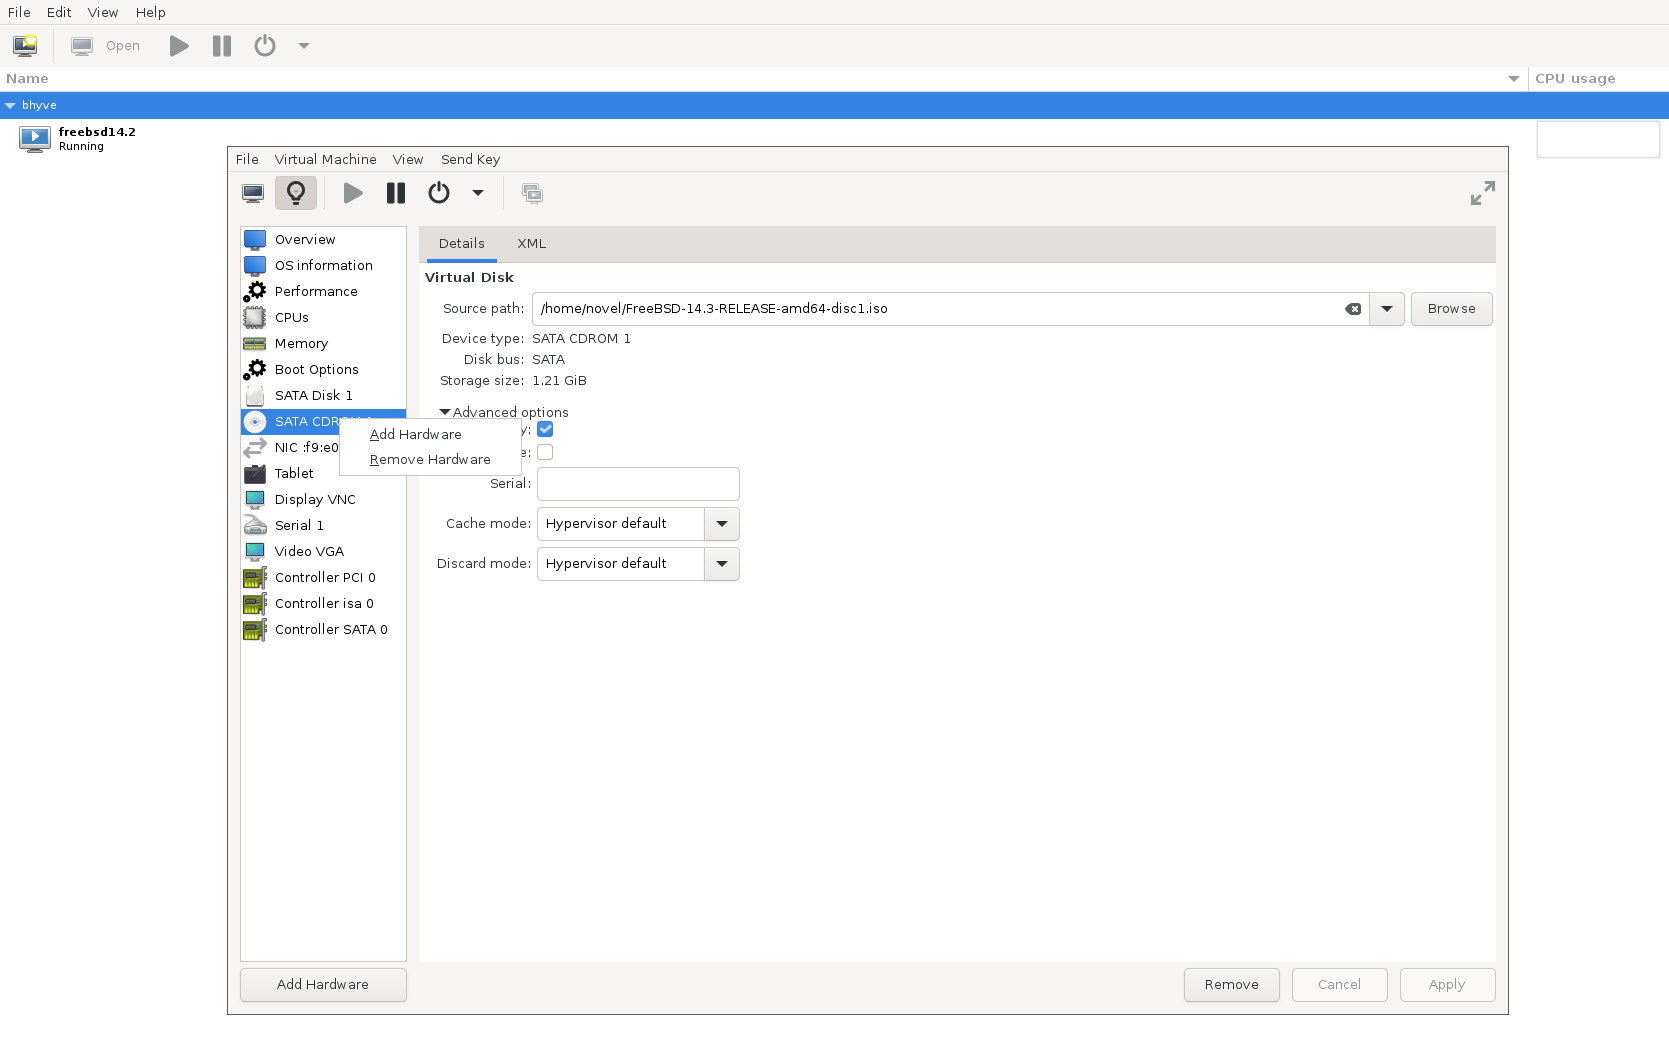
Once shut down, open "View" → "Details", find "SATA CDROM 1", right-click, and choose "Remove Hardware".

Remove CDROM

Now start the VM again — you should boot straight into your new FreeBSD system:

Fresh VM boot

That’s it for now. I plan to fix a few rough edges to make things smoother. In the meantime, feel free to send me suggestions or bug reports at novel@FreeBSD.org, or open a PR in FreeBSD Bugzilla.

Sunday, September 14, 2025

CI for libvirt/bhyve on FreeBSD

This year, I was lucky to be sponsored by the FreeBSD Foundation to improve libvirt's FreeBSD integration. One of the areas of focus was enabling CI. Actually, I had wanted to have some form of CI for a while, as manually testing things is quite time-consuming. Quite often, I don’t have enough time to test RC releases, so sometimes the releases ship with issues on FreeBSD. I knew about the libvirt TCK project (TCK stands for "Technology Compatibility Kit"), but I wasn’t sure whether it would be easier to implement my own testing routine or port the existing one to run on FreeBSD.

When I started this project, I decided to re-evaluate libvirt-tck, because it makes much more sense to re-use the existing tests—even if the initial porting requires more effort—than to implement everything from scratch.

The first steps of getting libvirt-tck to run were a bit tricky, because it starts with image generation using virt-builder. The virt-builder tool is part of libguestfs, which has not been ported to FreeBSD. I imagine porting libguestfs is not a trivial task, and it has been listed on the FreeBSD Wanted Ports list for a while. I didn’t want to dig into porting libguestfs, so I tried a few different workarounds—for example, creating a wrapper script to run virt-builder on a Linux host via SSH, then copying the resulting image with scp or using a shared partition. I also tried running it with Linuxulator. These methods had mixed success, but I later realized that once the image is generated, it can be reused for subsequent runs. It’s not ideal, but it works for now. With the image available, I could move on to the next phase: adjusting the tests themselves. This mainly involved handling cases where bhyve doesn’t support certain features and making a few patches to libvirt’s driver.

Some of that work was not very exciting, but it did result in new features being implemented, such as virtio-rnd support. Sometimes it was simply easier to add a missing feature than to handle its absence. It took a few merge requests to libvirt-tck and a few libvirt releases to get things working, but eventually the main set of tests I wanted to run worked fine. These tests include:

  • domain
  • networks
  • storage

The main tests I wanted to run were successful: domain, networks, and storage. However, there are still a few test groups that I don’t run, either because they aren’t relevant or aren’t supported on FreeBSD:

  • hooks
  • nwfilter
  • qemu
  • selinux

I think I need to take a closer look at the hooks tests. In the future, libvirt on FreeBSD might gain nwfilter support, so those tests could become relevant, but it’s unlikely to happen soon. I had no plans to support the qemu driver on FreeBSD (why, when bhyve is available?), but with the vmm(4) accelerator support for QEMU, it might become useful. And selinux is obviously not applicable.

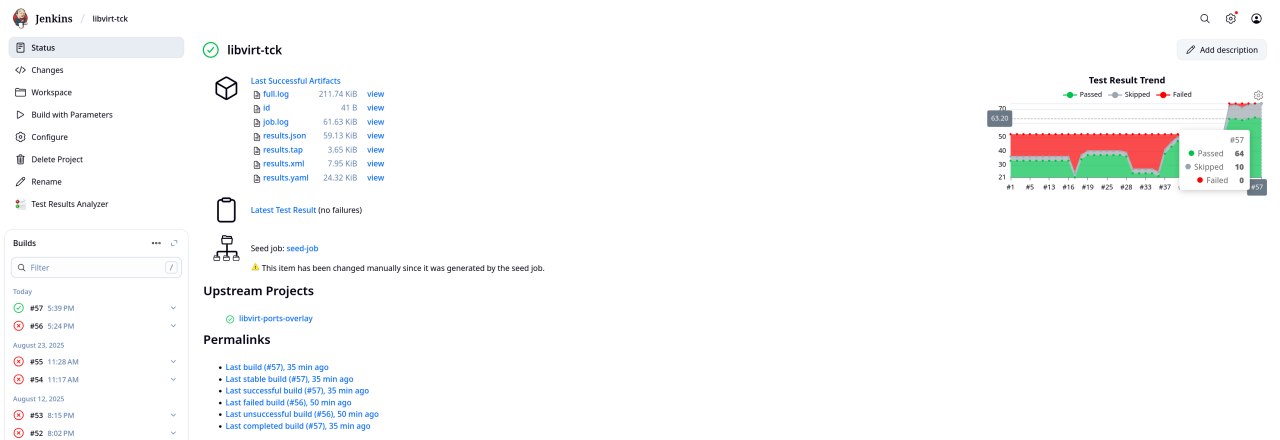
The final part was Jenkins configuration. Frankly, I don’t have much experience configuring Jenkins, though I do use it fairly often at work.

My "pipeline" (which is not really a pipeline in the strict sense) consists of two steps:

  • Build a "-devel" version of the libvirt port (pointing to a Git repository) using poudriere(8), and publish the results to a package repo.
  • Spin up a BastilleBSD container, install the libvirt packages from the previous step, check out libvirt-tck from Git, run the tests, and publish the results.

I use the "Job DSL" plugin to store job configuration, which is available in the Git repo. While the setup works, there are still several areas I’d like to improve:

  • I’d like to figure out how to build an arbitrary Git revision of the port, without updating DISTVERSION in Makefile or the checksums in distinfo. Probably it would be easier to just build libvirt manually. That would also simplify the pipeline.
  • I need to see if I can store not only job configurations in plain text, but also a complete Jenkins configuration, so I don’t have to manually install plugins and so on.
  • I definitely need to script the test image creation process.
libvirt tck jenkins

Saturday, June 2, 2018

Configuring OpenBGPD to announce VM's virtual networks

We use BGP quite heavily at work, and even though I'm not interacting with that directly, it feels like it's something very useful to learn at least on some basic level. The most effective and fun way of learning technology is finding some practical application, so I decided to see if it could help to improve networking management for my Virtual Machines.

My setup is fairly simple: I have a host that runs bhyve VMs and I have a desktop system from where I ssh to VMs, both hosts run FreeBSD. All VMs are connected to each other through a bridge and have a common network 10.0.1/24. The point of this exercise is to be able to ssh to these VMs from desktop without adding static routes and without adding vmhost's external interfaces to the VMs bridge.

I've installed openbgpd on both hosts and configured it like this:

vmhost: /usr/local/etc/bgpd.conf

AS 65002
router-id 192.168.87.48
fib-update no

network 10.0.1.1/24

neighbor 192.168.87.41 {
    descr "desktop"
    remote-as 65001
}

Here, router-id is set vmhost's IP address in my home network (192.168.87/24), fib-update no is set to forbid routing table update, which I initially set for testing, but keeping it as vmhost is not supposed to learn new routes from desktop anyway. network announces my VMs network and neighbor describes my desktop box.

Now the desktop box:

desktop: /usr/local/etc/bgpd.conf

AS 65001
router-id 192.168.87.41
fib-update yes

neighbor 192.168.87.48 {                                                                                                                                                                                           
        descr "vmhost"                                                                                                                                                                                             
        remote-as 65002                                                                                                                                                                                            
}

It's pretty similar to vmhost's bgpd.conf, but no networks are announced here, and fib-update is set to yes because the whole point is to get VM routes added.

Both hosts have to have the openbgpd service enabled:

/etc/rc.conf.local

openbgpd_enable="YES"

Now start the service (or wait until next reboot) using service openbgpd start and check if neighbors are there:

vmhost: bgpctl show summary

$ bgpctl show summary                                                                                                                                                                    
Neighbor                   AS    MsgRcvd    MsgSent  OutQ Up/Down  State/PrfRcvd                                                                                                                                   
desktop                 65001       1089       1090     0 09:03:17      0                                                                                                                                          
$

desktop: bgpctl show summary

$ bgpctl show summary
Neighbor                   AS    MsgRcvd    MsgSent  OutQ Up/Down  State/PrfRcvd
vmhost                  65002       1507       1502     0 09:04:58      1
$

Get some detailed information about the neighbor:

desktop: bgpctl sh nei vmhost

$ bgpctl sh nei vmhost                                                                                                                                                                    
BGP neighbor is 192.168.87.48, remote AS 65002                                                                                                                                                                     
 Description: vmhost                                                                                                                                                                                               
  BGP version 4, remote router-id 192.168.87.48                                                                                                                                                                    
  BGP state = Established, up for 09:06:25                                                                                                                                                                         
  Last read 00:00:21, holdtime 90s, keepalive interval 30s                                                                                                                                                         
  Neighbor capabilities:                                                                                                                                                                                           
    Multiprotocol extensions: IPv4 unicast                                                                                                                                                                         
    Route Refresh                                                                                                                                                                                                  
    Graceful Restart: Timeout: 90, restarted, IPv4 unicast                                                                                                                                                         
    4-byte AS numbers                                                                                                                                                                                              
                                                                                                                                                                                                                   
  Message statistics:                                                                                                                                                                                              
                  Sent       Received                                                                                                                                                                              
  Opens                    3          3                                                                                                                                                                            
  Notifications            0          2                                                                                                                                                                            
  Updates                  3          6                                                                                                                                                                            
  Keepalives            1499       1499                                                                                                                                                                            
  Route Refresh            0          0                                                                                                                                                                            
  Total                 1505       1510                                                                                                                                                                            
                                                                                                                                                                                                                   
  Update statistics:                                                                                                                                                                                               
                  Sent       Received                                                                                                                                                                              
  Updates                  0          1                                                                                                                                                                            
  Withdraws                0          0                                                                                                                                                                            
  End-of-Rib               1          1                                                                                                                                                                            
                                                                                                                                                                                                                   
  Local host:         192.168.87.41, Local port:    179                                                                                                                                                            
  Remote host:        192.168.87.48, Remote port: 13528                                                                                                                                                            
                                                                                                                                                                                                                   
$

By the way, as you can see, bgpctl supports shortened commands, e.g. sh nei instead of show neighbor.

Now look for that VMs route:

desktop: bgpctl show rib

$ sudo bgpctl show rib
flags: * = Valid, > = Selected, I = via IBGP, A = Announced, S = Stale
origin: i = IGP, e = EGP, ? = Incomplete

flags destination          gateway          lpref   med aspath origin
*>    10.0.1.0/24          192.168.87.48      100     0 65002 i
$

So that VMs network, 10.0.1/24, it's there! Now check if the system routing table was updated and has this route:

desktop

$ route -n get 10.0.1.45   
   route to: 10.0.1.45
destination: 10.0.1.0                                                                                                                                                                                              
       mask: 255.255.255.0                                                                                                                                                                                         
    gateway: 192.168.87.48                                                                                                                                                                                         
        fib: 0                                                                                                                                                                                                     
  interface: re0                                                                                                                                                                                                   
      flags:                                                                                                                                                                               
 recvpipe  sendpipe  ssthresh  rtt,msec    mtu        weight    expire                                                                                                                                             
       0         0         0         0      1500         1         0                                                                                                                                               
$ ping -c 1 10.0.1.45                                                                                                                                                                     
PING 10.0.1.45 (10.0.1.45): 56 data bytes                                                                                                                                                                          
64 bytes from 10.0.1.45: icmp_seq=0 ttl=63 time=0.192 ms                                                                                                                                                           
                                                                                                                                                                                                                   
--- 10.0.1.45 ping statistics ---                                                                                                                                                                                  
1 packets transmitted, 1 packets received, 0.0% packet loss                                                                                                                                                        
round-trip min/avg/max/stddev = 0.192/0.192/0.192/0.000 ms                                                                                                                                                         
$

Whoa, things work as expected!

Conclusion

As mentioned already, similar result could be achieved without using BGP by using either static routes or bridging interfaces differently, but the purpose of this exercise is to get some basic hands-on experience with BGP. Right now I'm looking into extending my setup in order to try more complex BGP schema. I'm thinking about adding some software switches in front of my VMs or maybe adding a second VM host (if budget allows). You're welcome to comment if you have some ideas how to extend this setup for educational purposes in the context of BGP and networking.

As a side note, I really like openbgpd so far. Its configuration file format is clean and simple, documentation is good, error and information messages are clear, and CLI has intuitive syntax.

Sunday, August 6, 2017

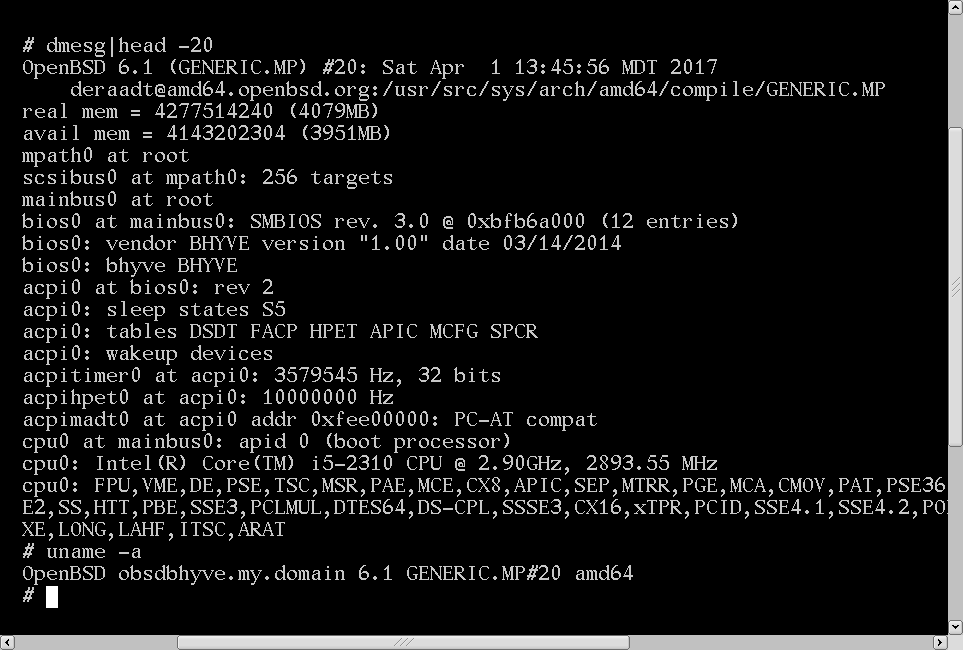
Creating OpenBSD guest with libvirt/bhyve

I've been asked a couple of times how to setup OpenBSD guest with libvirt/bhyve. It's fairly straight-forward, but minimal libvirt version required for that is 3.5.0 because it's the first version that allows to specify vgaconf settings.

First, download the installation image: https://ftp.openbsd.org/pub/OpenBSD/6.1/amd64/install61.fs and create a disk image:

truncate -s 2G openbsd61.raw

Create an initial XML (pay attention to the vgaconf='off' bit):

Now with virsh do:

virsh # define /path/to/openbsd61.xml
Domain openbsd61 defined from /path/to/openbsd61.xml

virsh # start openbsd61
Domain openbsd61 started

virsh # vncdisplay openbsd61                                                                                                                                                                                       
127.0.0.1:0                                                                                                                                                                                                        

Using VNC client connect to the guest at the specified port:

vncviewer :0

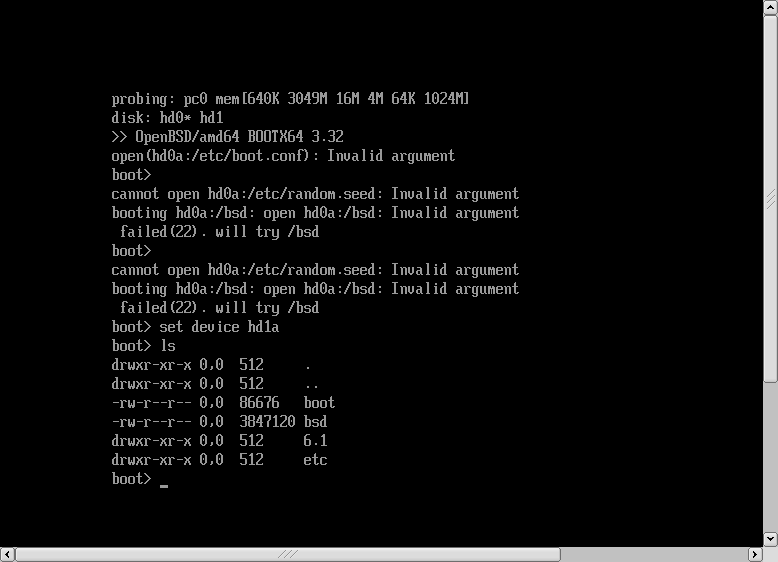
This gives a boot loader prompt. For some reason, it doesn't set root device properly, so I have to do:

set device hd1a
boot

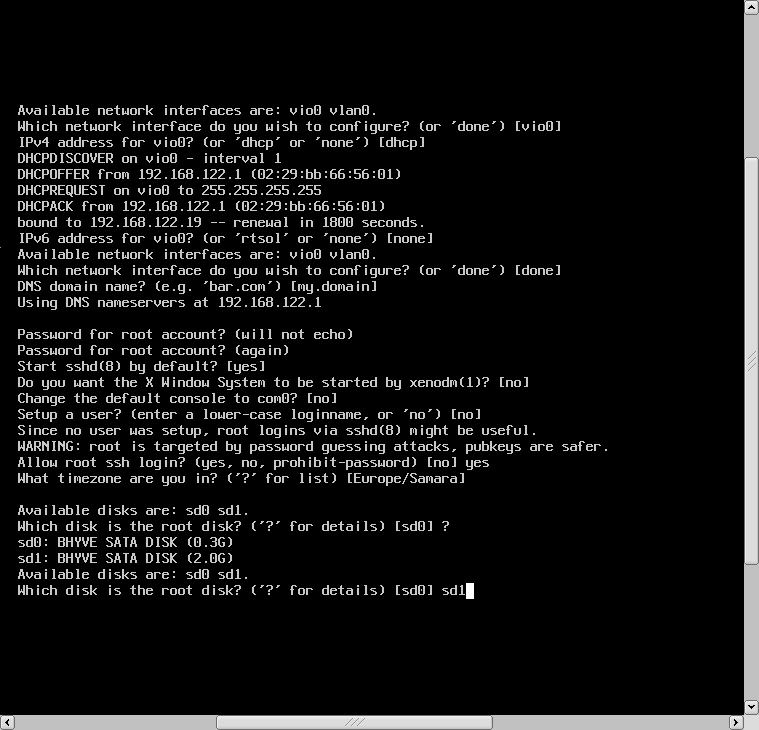
Then there'll be a number of installer questions (where I usually accept defaults) until it asks what disk should be used as a root device. It's important to check this carefully and choose the right one (you can find it by its size for example), otherwise it might just try to override the install image.

When the installation finishes, shutdown the guest, go back to virsh and edit the domain xml:

virsh # edit openbsd61

And remove the disk block corresponding to install61.fs. And then start domain again:

virsh # start openbsd61   
Domain openbsd61 started  

Now you should be able to connect to the guest via VNC or via SSH.

PS My sample xml uses the autoport feature that will be available only in libvirt 3.7.0. If you're using an earlier version, specify the VNC port explicitly:

<graphics type='vnc' port='5904'>

Saturday, April 1, 2017

Update on libvirt bhyve driver: UEFI support

New libvirt version 3.2.0 will be released really soon (maybe even before I publish this post), and I'm happy to announce that it brings UEFI support for the bhyve driver.

Specifically, starting with this version it's possible:

  • Point domains to the UEFI boot ROM to boot UEFI guests (instead of using grub-bhyve(1) for example)
  • Connect to guests through VNC (e.g. using vncviewer from net/tigervnc)
  • Use an USB tablet input device

I've updated the official documentation with description of these features and an example, scroll to Example config (Linux UEFI guest, VNC, tablet).

Gotchas: as you might now, bhyve's fbuf device accepts the vga option (e.g. vga=off etc), and different guest OSes might require different settings to make things work. It's not possible to change this using libvirt right now, so the default value (which is vga=io) is used, hence some guests will not work.

Kudos to Fabian Freyer for doing the majority of that work as a part of GSoC 2016.

Friday, November 4, 2016

bhyve vs VirtualBox benchmarking, part2

"There are in order of increasing severity: lies, damn lies, statistics, and computer benchmarks",
man 8 diskinfo

I got some feedback to my previous post about benchmarking of bhyve and VirtualBox:

So I decided to do some more tests and include e1000 for networking tests and try different drivers and image types for I/O tests.

Networking test

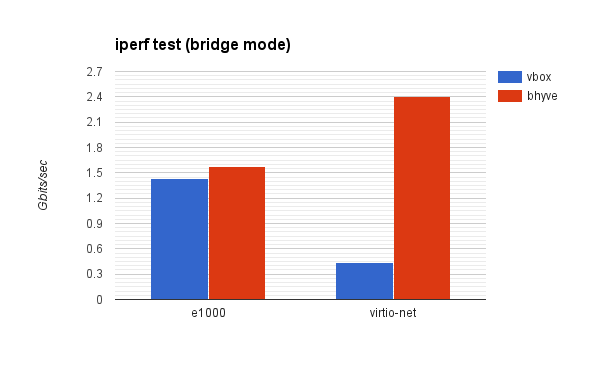
This is a little more extensive test than the one in my previous blog post, now it includes e1000 and virtio-net for both VirtualBox and bhyve. Setting for the test is still the same: iperf and bridged network mode. Commands remain the same, on VM side I run:

iperf -s

On the host, I run:

iperf -c $vmip

And calculate the average of 8 runs. Results:

And actual values (in Gbits/sec) are:

VirtualBoxbhyve
e10001.428751.57375
virtio-net0.432752.4

The most shocking part here is that in VirtualBox e1000 is more than 3x times faster than virtio-net. This seems a little strange, esp. considering that e1000 performance in bhyve is almost the same, but virtio-net in bhyve is approx. 1.5x times faster than e1000 (that's probably a very huge difference too, but at least it's expected virtio to be faster).

I/O testing

I decided to check things suggested in the tweet above and started with disk configuration. I've converted my image to the "fixed size" type image like this:

VBoxManage clonehd uefi_fbsd_20gigs.vdi uefi_fbsd_20gigs_fixed.vdi --variant Fixed

Then I conducted tests for the following configurations:

  • VirtualBox + fixed size image
  • VirtualBox + dynamic size image
  • bhyve + virtio-blk
  • bhyve + ahci-hd

The same image was used for all tests. Fixed size image was produced using the command specified above, raw image for bhyve was created from the VirtualBox image using the qemu-img(1) tool.

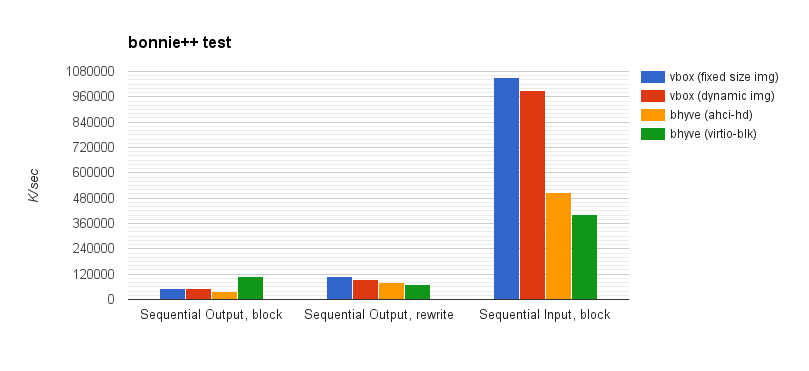
I started with bonnie++ test at results surprised me, to put it softly:

Here, we can see that bhyve with virtio-blk shows the best write speed (that is expected), but then shows the worst rewrite speed (which is a little surprising, but the gap is minimal) and shows the worst read speed (more than 2 times slower than VirtualBox; extremely surprising). After that I decided to take a few days break and then to try some different ways of benchmarking.

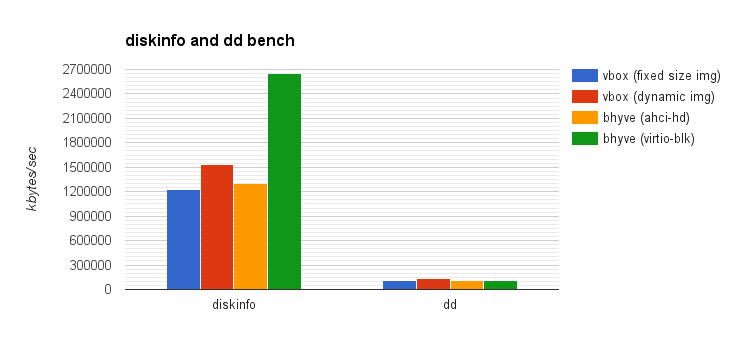
So, for read performance I used the diskinfo(8) tool this way:

diskinfo -tv ada0 | grep middle

and use the average of 16 runs. For writing, I used dd(1):

dd bs=1M count=2048 if=/dev/zero of=test conv=sync; sync; rm test

and also use the average of 16 runs. I got the following results:

And the numbers (all values are kbytes/sec):

vbox (fixed size img)vbox (dynamic img)bhyve (ahci-hd)bhyve (virtio-blk)
diskinfo1232397152877912960552647685
dd113737135088113889115924

Frankly, this didn't help to figure out state of things, because these results are kind of opposite to what bonnie++ showed: bhyve with virtio-blk shows very high read speed as demonstrated by diskinfo, 1.7x faster than VirtualBox. On the other hand, the numbers that diskinfo is showing are crazy: 2647 mbytes/sec. This feels more like RAM transfer rates, so it looks like some sort of caching is involved here.

As for the dd(1) test part, bhyve with virtio-blk is 16.5% slower than VirtualBox using dynmanic size image.

Conclusion

  • For VirtualBox, if choosing between e1000 and virtio-net, e1000 definitely provides better performance over virtio-net, at least on FreeBSD hosts with FreeBSD guests
  • virtio-net in bhyve is approx. 1.5x faster than VirtualBox with e1000
  • I'll refrain from comments on I/O tests.

Further Reading

Sunday, October 16, 2016

bhyve vs VirtualBox benchmark

I've always been curious how bhyve performance compares to other hypervisors, so I've decided to compare it with VirtualBox. Target audience of these projects is somewhat different, though. VirtualBox is targeted more to desktop users (as it's easy to use, has a nice GUI and guest additions for running GUI within a guest smoothly). And bhyve appears to be targeting more experienced users and operators as it's easier to create flexible configurations with it, as well as automate things. Anyway, it's still interesting to find out which one is faster.

Setup Overview

I used my development box for this benchmarking, and it has no additional load, so results should be more or less clean in that matter. It's running 12-CURRENT:

FreeBSD 12.0-CURRENT amd64

as of Oct, 4th.

It has Intel i5 CPU, 16 gigs of RAM and some old 7200 IDE HDD:

CPU: Intel(R) Core(TM) i5-4690 CPU @ 3.50GHz (3491.99-MHz K8-class CPU)
  Origin="GenuineIntel"  Id=0x306c3  Family=0x6  Model=0x3c  Stepping=3
  Features=0xbfebfbff<FPU,VME,DE,PSE,TSC,MSR,PAE,MCE,CX8,APIC,SEP,MTRR,PGE,MCA,CMOV,PAT,PSE36,CLFLUSH,DTS,ACPI,MMX,FXSR,SSE,SSE2,SS,HTT,TM,PBE>
  Features2=0x7ffafbff<SSE3,PCLMULQDQ,DTES64,MON,DS_CPL,VMX,SMX,EST,TM2,SSSE3,SDBG,FMA,CX16,xTPR,PDCM,PCID,SSE4.1,SSE4.2,x2APIC,MOVBE,POPCNT,TSCDLT,AESNI,XSAVE,OSXSAVE,AVX,F16C,RDRAND>
  AMD Features=0x2c100800<SYSCALL,NX,Page1GB,RDTSCP,LM>
  AMD Features2=0x21<LAHF,ABM>
  Structured Extended Features=0x2fbb<FSGSBASE,TSCADJ,BMI1,HLE,AVX2,SMEP,BMI2,ERMS,INVPCID,RTM,NFPUSG>
  XSAVE Features=0x1<XSAVEOPT>
  VT-x: PAT,HLT,MTF,PAUSE,EPT,UG,VPID
  TSC: P-state invariant, performance statistics
real memory  = 17179869184 (16384 MB)
avail memory = 16448757760 (15686 MB)
ada0: <ST3200822A 3.01> ATA-6 device

For tests I used two VMs, one in bhyve and one in VirtualBox. A bhyve VM was started like this:

bhyve -c 2 -m 4G -w -H -S \
        -s 0,hostbridge \
        -s 4,ahci-hd,/home/novel/img/uefi_fbsd_20gigs.raw \
        -s 5,virtio-net,tap1 \
        -s 29,fbuf,tcp=0.0.0.0:5900,w=800,h=600,wait \
        -s 30,xhci,tablet \
        -s 31,lpc -l com1,stdio \
        -l bootrom,/usr/local/share/uefi-firmware/BHYVE_UEFI.fd \
        vm0

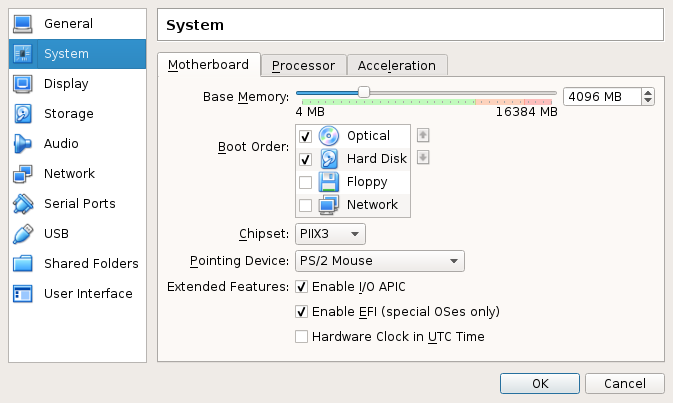
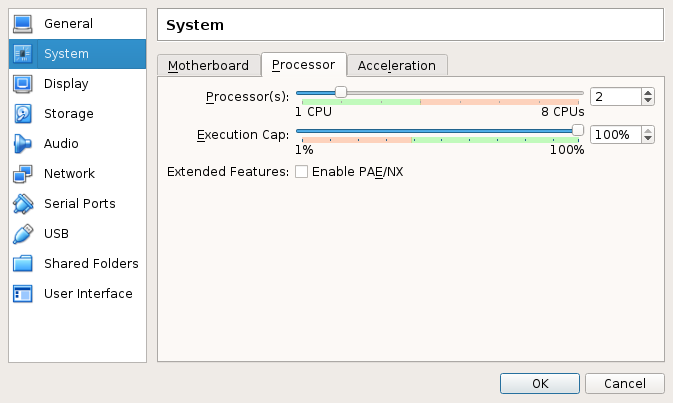
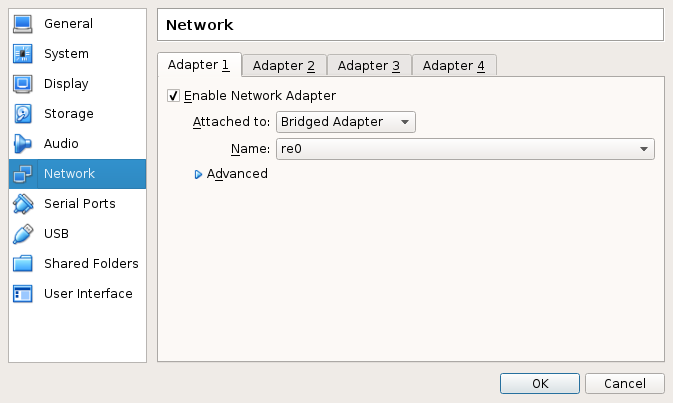
Main pieces of the VirtualBox VM configuration are displayed on these screenshots:

Guest is:

FreeBSD 11.0-RELEASE-p1 amd64

on UFS. VirtualBox version 5.1.6 r110634 installed via pkg(8).

World Compilation

The first test is running:

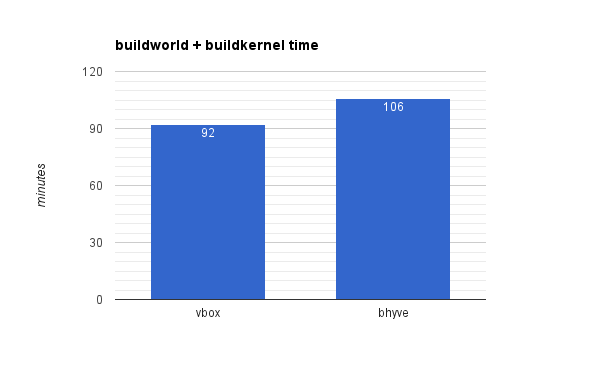
make buildworld buildkernel -j4

on releng/11.0 source tree.

The result is that bhyve is approx. 15% slower (106 minutes vs 92 minutes for VirtualBox):

iperf test

The next test is network performance check using the iperf(8) tool. In order to avoid interaction with hardware NICs and switches (with unpredictable load), all the traffic for testing stays withing the host system:

vm# iperf -s
host# iperf -c $vmip

As a reminder, both bhyve and VirtualBox VMs are configured to use bridged networking. Also, both are using virtio-net NICs.

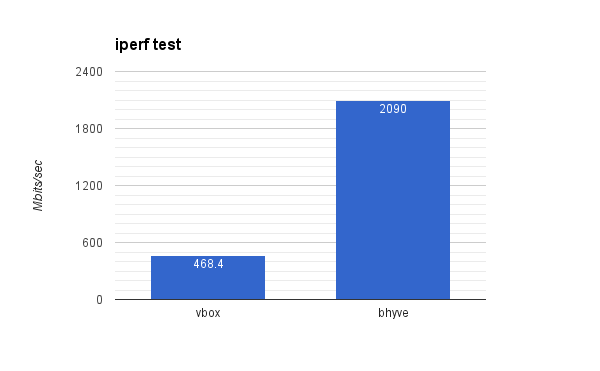
Result is a little strange because bhyve appears to be more than 4 times faster here:

That seemed to be strange to me, so I ran the test multiple times for both VirtualBox and bhyve, however, all the time the results were pretty close. I'm yet to find out if that's really correct result or something wrong with my testing or setup.

bonnie++ test

bonnie++ is a benchmarking tool for hard drivers and filesystems. Let's jump to the results right away:

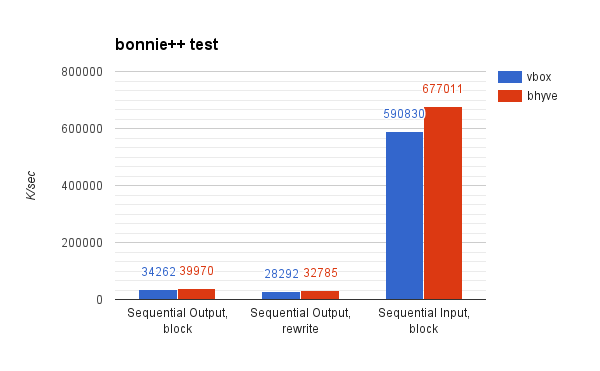
This makes bhyve write and read speeds approx. 15% higher than VirtualBox. There's a note though: for VirtualBox VM I used VDI disk format (as it's native for VirtualBox) and SATA emulation because there's no virtio-blk support in VirtualBox. In case of bhyve I also used SATA emulation (I actually intended to use virtio-blk here, but forgot to change commandline), but on a raw image instead.

xz(1) on memory disk test

The last test is to unpack and pack an XZ archive on memory disk. I used memory disk specifically to exclude disk I/O from the equation. For a sample archive I choose:

ftp://ftp.freebsd.org/pub/FreeBSD/releases/ISO-IMAGES/11.0/FreeBSD-11.0-RELEASE-amd64-memstick.img.xz

And the commands to unpack and pack were:

unxz FreeBSD-11.0-RELEASE-amd64-memstick.img.xz 
xz FreeBSD-11.0-RELEASE-amd64-memstick.img

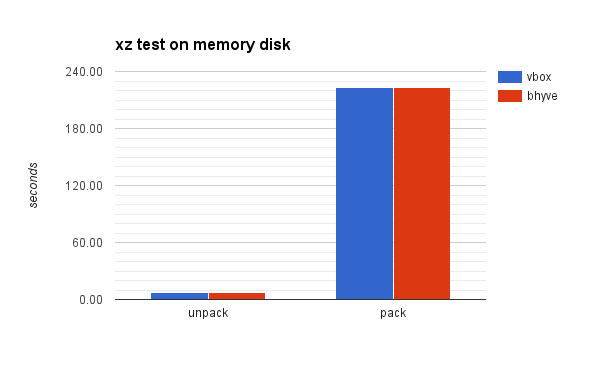
Results are almost the same here:

Summary

  • CPU and RAM performance seems to be identical (though it's not clear why buildworld takes longer on bhyve)
  • I/O performance is 15% better with bhyve
  • Networking performance is 4x better with bhyve (this looks suspicious and requires additional research; also, I'm not familiar with bridged networking implementation in VirtualBox, maybe it could explain the difference)

Further Reading

PS: Initially I was going to use phoronix-test-suite. However, it appears that a lot of important tests fail to run on FreeBSD. The ones that did run, such as apache or sqlite tests, do not seem very representative to me. I'll probably try to run similar tests but with Linux guest.

Tuesday, October 4, 2016

Bhyve Networking Options

Once in a while people on the #bhyve IRC channel on freenode ask questions about bhyve networking configuration, i.e. how to configure things to let a VM have network access.

There are at least 3 ways to do that (that I'm aware of, maybe there are more):

  • Bridged networking
  • NAT
  • NIC Passthrough

I'll try to go over each of those and describe how things work in each scheme.

Common configuration

Common things for all the setups: I'm running FreeBSD 12-CURRENT amd64, I'm having two NICs (re0 and re1), both connected to a home router.

Bridged Networking

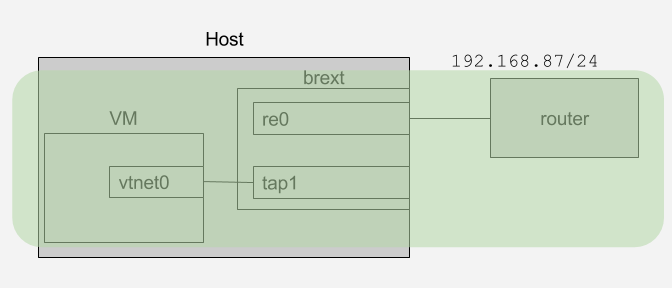
Bridged networking, just like name suggests, means bridging together VM interfaces and the uplink interface, putting those in the same L2 segment.

Configuration is relatively straight-forward. Let's start from a completely fresh configuration, where we don't even have re1 (uplink) configured:

kloomba# ifconfig re1
re1: flags=8802 metric 0 mtu 1500
        options=8209b
        ether 18:a6:f7:01:66:52
        nd6 options=29
        media: Ethernet autoselect (100baseTX )
        status: active
kloomba#

Now let's create a bridge named brextand add re1 to it. Also, we'll run dhclient on it to obtain an IP address (in my setup it comes from a DHCP server running on my home router):

kloomba# ifconfig bridge create name brext                                                                                                                                                
kloomba# ifconfig brext addm re1
kloomba# ifconfig brext up
kloomba# ifconfig re1 up
kloomba# dhclient brext

As a result we have an IP address assigned to the brext bridge:

brext: flags=8843 metric 0 mtu 1500
        ether 02:29:bb:66:56:01
        inet 192.168.87.46 netmask 0xffffff00 broadcast 192.168.87.255 
        nd6 options=1
        groups: bridge 
        id 00:00:00:00:00:00 priority 32768 hellotime 2 fwddelay 15
        maxage 20 holdcnt 6 proto rstp maxaddr 2000 timeout 1200
        root id 00:00:00:00:00:00 priority 32768 ifcost 0 port 0
        member: re1 flags=143
                ifmaxaddr 0 port 2 priority 128 path cost 200000

Now we need to create a tap (that will be tap1 in my case) interface for VM and boot it up:

kloomba# ifconfig tap create up
kloomba# ifconfig brext addm tap1

And boot a VM like in a way you like, for example:

bhyve -c 2 -m 4G -w -H \
        -s 0,hostbridge \
        -s 3,ahci-cd,/home/novel/FreeBSD-11.0-CURRENT-amd64-20160217-r295683-disc1.iso \
        -s 5,virtio-net,tap1 \
        -s 29,fbuf,tcp=0.0.0.0:5900,w=800,h=600,wait \
        -s 30,xhci,tablet \
        -s 31,lpc -l com1,stdio \
        -l bootrom,/usr/local/share/uefi-firmware/BHYVE_UEFI.fd \
        vm0

Now we can open up a VNC client and connect to this VM (I use vncviewer :0) and do the following:

vm# dhclient vtnet0

If things go well, you'll get an IP address from the same subnet as IP address on host's re1 and, obviously, it's served by the same DHCP server that serves the host's re1.

### host ###
kloomba# ifconfig brext
brext: flags=8843 metric 0 mtu 1500
        ether 02:29:bb:66:56:01
        inet 192.168.87.46 netmask 0xffffff00 broadcast 192.168.87.255
        nd6 options=1
        groups: bridge 
        id 00:00:00:00:00:00 priority 32768 hellotime 2 fwddelay 15
        maxage 20 holdcnt 6 proto rstp maxaddr 2000 timeout 1200
        root id 00:00:00:00:00:00 priority 32768 ifcost 0 port 0
        member: tap1 flags=143
                ifmaxaddr 0 port 10 priority 128 path cost 2000000
        member: re1 flags=143
                ifmaxaddr 0 port 2 priority 128 path cost 200000
kloomba# 

### vm ###
root@vm0:~ # ifconfig vtnet0
vtnet0: flags=8943 metric 0 mtu 1500
        options=80028
        ether 00:a0:98:1b:c8:07
        inet 192.168.87.47 netmask 0xffffff00 broadcast 192.168.87.255
        nd6 options=29
        media: Ethernet 10Gbase-T 
        status: active
root@vm0:~ # 

To understand a little better what's going on here, let's run ping on a VM:

vm# ping 8.8.8.8

... and check how it looks like on the host:

kloomba# tcpdump -qni brext -c2 -e host 8.8.8.8 
tcpdump: verbose output suppressed, use -v or -vv for full protocol decode
listening on brext, link-type EN10MB (Ethernet), capture size 65535 bytes
16:09:44.755083 00:a0:98:1b:c8:07 > 40:4a:03:76:de:1d, IPv4, length 98: 192.168.87.47 > 8.8.8.8: ICMP echo request, id 25603, seq 4, length 64
16:09:44.783499 40:4a:03:76:de:1d > 00:a0:98:1b:c8:07, IPv4, length 98: 8.8.8.8 > 192.168.87.47: ICMP echo reply, id 25603, seq 4, length 64
2 packets captured
6 packets received by filter
0 packets dropped by kernel
kloomba# 

What we can see here? Packets from our VM are leaving the host with the IP address it has on vtnet0, MAC address is also vtnet0's MAC. BTW, 40:4a:03:76:de:1d is MAC of my router.

That is it, it works, does not need stuff like firewalls or routing configuration to work, so this approach is relatively easy. There are downsides of that, however. It's pretty common that the router your PC is connected to is configured to only pass only single MAC per networking port, or maybe even only a whitelisted MAC (that's quite common in office environments) or if your home router does not support that. In that case you'll have to go with the NAT approach that I'll describe next.

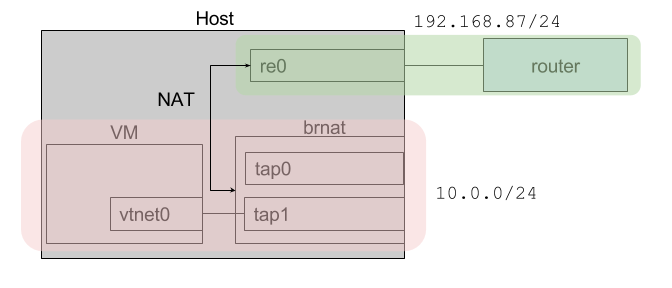
NAT Networking

Let's assume we're starting from scratch and don't have that brext bridge we created in the previous section. And we're again starting with creation of the new bridge:

kloomba# ifconfig bridge create name brnat up
kloomba# ifconfig tap create up
kloomba# ifconfig brnat addm tap1
brnat: flags=8843 metric 0 mtu 1500
        ether 02:29:bb:66:56:01
        nd6 options=1
        groups: bridge 
        id 00:00:00:00:00:00 priority 32768 hellotime 2 fwddelay 15
        maxage 20 holdcnt 6 proto rstp maxaddr 2000 timeout 1200
        root id 00:00:00:00:00:00 priority 32768 ifcost 0 port 0
        member: tap1 flags=143
                ifmaxaddr 0 port 10 priority 128 path cost 55
kloomba# 

As we can see, we no longer have our uplink interface re1 in the bridge. Now let's start a VM, command will be exactly the same as in the previous section, so I won't repeat it here.

Now, if we go to the VM and try to do dhclient vtnet0 nothing happens, because there are no DHCP server reachable from this VM. It's a good time to decide what IP range we'll use for our VM(s). Let's go with something like 10.0.0.0/24. Let's configure pf to do NATing for us. Basic /etc/pf.conf for this purpose might look like this:

ext_if="re1"

virt_net="10.0.0.0/24"

scrub all

nat on $ext_if from $virt_net to any -> ($ext_if)

pass log all

What we're doing here? For packets coming from $virt_net (our VMs range) we're translating its source address from 10.0.0.0/24 internal net to address of our external interface (re1). Now we can load the rules, enable pf and check if that works.

kloomba# pfctl -f /etc/pf.conf
kloomba# pfctl -e
pfctl: pf already enabled
kloomba# 

We also need to assign a proper IP address to our bridge:

kloomba# ifconfig brnat inet 10.0.0.1/24

Also, it's a good time to ensure that IP forwarding is enabled on the host: sysctl net.inet.ip.forwarding=1.

Now VM is expected to get connectivity if we manually assign an IP address to it:

vm0# ifconfig vtnet0 inet 10.0.0.2/24 up
vm0# route add default 10.0.0.1

Now things should work and we can actually see what's going on with the packets. Let's start ping again in our VM: ping 8.8.8.8 and tcpdump on interfaces on the host. Let's start with brnat:

kloomba# tcpdump -ni brnat -c 2 -e host 8.8.8.8
tcpdump: verbose output suppressed, use -v or -vv for full protocol decode
listening on brnat, link-type EN10MB (Ethernet), capture size 65535 bytes
17:28:36.101514 00:a0:98:1b:c8:07 > 02:29:bb:66:56:01, ethertype IPv4 (0x0800), length 98: 10.0.0.2 > 8.8.8.8: ICMP echo request, id 21507, seq 62, length 64
17:28:36.129840 02:29:bb:66:56:01 > 00:a0:98:1b:c8:07, ethertype IPv4 (0x0800), length 98: 8.8.8.8 > 10.0.0.2: ICMP echo reply, id 21507, seq 62, length 64
2 packets captured
2 packets received by filter
0 packets dropped by kernel
kloomba# 

And on our uplink interface re1:

kloomba# tcpdump -ni re1 -c 2 -e host 8.8.8.8                                                                                                                                                                       
tcpdump: verbose output suppressed, use -v or -vv for full protocol decode
listening on re1, link-type EN10MB (Ethernet), capture size 65535 bytes
17:31:37.898499 18:a6:f7:01:66:52 > 40:4a:03:76:de:1d, ethertype IPv4 (0x0800), length 98: 192.168.87.44 > 8.8.8.8: ICMP echo request, id 19102, seq 236, length 64
17:31:37.926781 40:4a:03:76:de:1d > 18:a6:f7:01:66:52, ethertype IPv4 (0x0800), length 98: 8.8.8.8 > 192.168.87.44: ICMP echo reply, id 19102, seq 236, length 64
2 packets captured
3 packets received by filter
0 packets dropped by kernel
kloomba# 

We can see that at this point no information about VM is exposed here (i.e. no VM subnet 10.0.0.0/24, no vtnet0 MACs etc); NAT works as expected.

As you can see, NAT networking is a little more complex configuration-wise. Though it's probably the most general solution, you don't have to rely on external routers configuration, bridging support in the hardware/drivers and so forth.

This configuration can be simplified though, a good step to it would be configuring DHCP server on brnat to serve IP addresses from our VM range. This could be done for example using the dns/dnsmasq tiny DHCP server.

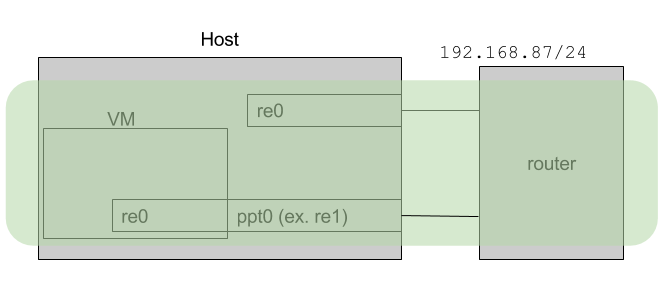
NIC Passthrough

This is a somewhat fun way to setup networking because a) you'll need 1 (one) physical NIC per VM b) you'll need one more physical NIC for host if you want it to keep connected. This might be much better with SR-IOV though I've never tried SR-IOV cards on FreeBSD. Anyway, back to the point.

I'm going to passthrough re1, I'm running pciconf -l -v to find its PCI address:

re1@pci0:3:0:0:        class=0x020000 card=0x85051043 chip=0x816810ec rev=0x09 hdr=0x00
    vendor     = 'Realtek Semiconductor Co., Ltd.'
    device     = 'RTL8111/8168/8411 PCI Express Gigabit Ethernet Controller'
    class      = network
    subclass   = ethernet

So I add pptdevs="3/0/0" to /boot/loader.conf and reboot. After reboot it looks this way:

ppt0@pci0:3:0:0:        class=0x020000 card=0x85051043 chip=0x816810ec rev=0x09 hdr=0x00
    vendor     = 'Realtek Semiconductor Co., Ltd.'
    device     = 'RTL8111/8168/8411 PCI Express Gigabit Ethernet Controller'
    class      = network
    subclass   = ethernet

Now starting a VM like this:

bhyve -c 2 -m 1G -w -H -S \
        -s 0,hostbridge \
        -s 4,ahci-hd,/home/novel/img/uefi_fbsd.raw \
        -s 6,passthru,3/0/0 \
        -s 29,fbuf,tcp=0.0.0.0:5900,w=800,h=600,wait \
        -s 30,xhci,tablet \
        -s 31,lpc -l com1,stdio \
        -l bootrom,/usr/local/share/uefi-firmware/BHYVE_UEFI.fd \
        vm0

If things go well (i.e.: host supports IOMMU, device supports passthrough, ...), we'll see this device in a VM exactly like it would appear in host:

re0@pci0:0:6:0: class=0x020000 card=0x85051043 chip=0x816810ec rev=0x09 hdr=0x00
    vendor     = 'Realtek Semiconductor Co., Ltd.'
    device     = 'RTL8111/8168/8411 PCI Express Gigabit Ethernet Controller'
    class      = network
    subclass   = ethernet

At this point it can be used just like it was not a VM but another host connected to a network with its own NIC. Once can run dhclient re0 etc.

Further reading

Update Oct, 17th, 2016: added pics.

Saturday, March 15, 2014

Bhyve in libvirt

I continue my activities on improving libvirt FreeBSD support and I have some good news. Recent libvirt release, 1.2.2, is the first version to include the bhyve support!

Currently it's in its early stage and doesn't support some of the features and doesn't provide good flexibility, it's just a basic stuff at this point. I'll not provide a detailed description and instead will point you to the document: Libvirt: Bhyve driver. You'll find a sample domain XML which covers all the features currently supported by the driver.

TODO list

While there are lots and lots of things to be done, there are some specific ones I'm focusing on:

  • Console support through nmdm(4). This is very important feature for debugging and checking what's going on in the guest.
  • Domains autostart support. There's a patch already kindly provided by David Shane Holden that just needs review and testing.
  • A little more flexible slot ids allocation / device configuration.

Qemu/FreeBSD status

As a side note, I'll give an update what's changed since my previous blog post about qemu libvirt driver on FreeBSD. So, here's what's new:

  • Proper TAP interfaces cleanup
  • CPU affinity configuration support, check http://libvirt.org/formatdomain.html#elementsCPUAllocation for details
  • virsh console should now work if you run it from freebsd host and connect to libvirtd on Linux
  • Node status support (such as virsh nodecpustats, virsh nodememstats)

Some of these are available in already released versions, some are only in git version.