Saturday, October 19, 2019

urbandict 0.6.1

I've released a new version of urbandict, a Python client and a CLI tool for https://urbandictionary.com. Version 0.6.1 includes support for word categories, that, apparently, was recently added by urbandictionary.

You can upgrade it using pip install --upgrade urbandict or grab source code on github.

Saturday, June 2, 2018

Configuring OpenBGPD to announce VM's virtual networks

We use BGP quite heavily at work, and even though I'm not interacting with that directly, it feels like it's something very useful to learn at least on some basic level. The most effective and fun way of learning technology is finding some practical application, so I decided to see if it could help to improve networking management for my Virtual Machines.

My setup is fairly simple: I have a host that runs bhyve VMs and I have a desktop system from where I ssh to VMs, both hosts run FreeBSD. All VMs are connected to each other through a bridge and have a common network 10.0.1/24. The point of this exercise is to be able to ssh to these VMs from desktop without adding static routes and without adding vmhost's external interfaces to the VMs bridge.

I've installed openbgpd on both hosts and configured it like this:

vmhost: /usr/local/etc/bgpd.conf

AS 65002
router-id 192.168.87.48
fib-update no

network 10.0.1.1/24

neighbor 192.168.87.41 {
    descr "desktop"
    remote-as 65001
}

Here, router-id is set vmhost's IP address in my home network (192.168.87/24), fib-update no is set to forbid routing table update, which I initially set for testing, but keeping it as vmhost is not supposed to learn new routes from desktop anyway. network announces my VMs network and neighbor describes my desktop box.

Now the desktop box:

desktop: /usr/local/etc/bgpd.conf

AS 65001
router-id 192.168.87.41
fib-update yes

neighbor 192.168.87.48 {                                                                                                                                                                                           
        descr "vmhost"                                                                                                                                                                                             
        remote-as 65002                                                                                                                                                                                            
}

It's pretty similar to vmhost's bgpd.conf, but no networks are announced here, and fib-update is set to yes because the whole point is to get VM routes added.

Both hosts have to have the openbgpd service enabled:

/etc/rc.conf.local

openbgpd_enable="YES"

Now start the service (or wait until next reboot) using service openbgpd start and check if neighbors are there:

vmhost: bgpctl show summary

$ bgpctl show summary                                                                                                                                                                    
Neighbor                   AS    MsgRcvd    MsgSent  OutQ Up/Down  State/PrfRcvd                                                                                                                                   
desktop                 65001       1089       1090     0 09:03:17      0                                                                                                                                          
$

desktop: bgpctl show summary

$ bgpctl show summary
Neighbor                   AS    MsgRcvd    MsgSent  OutQ Up/Down  State/PrfRcvd
vmhost                  65002       1507       1502     0 09:04:58      1
$

Get some detailed information about the neighbor:

desktop: bgpctl sh nei vmhost

$ bgpctl sh nei vmhost                                                                                                                                                                    
BGP neighbor is 192.168.87.48, remote AS 65002                                                                                                                                                                     
 Description: vmhost                                                                                                                                                                                               
  BGP version 4, remote router-id 192.168.87.48                                                                                                                                                                    
  BGP state = Established, up for 09:06:25                                                                                                                                                                         
  Last read 00:00:21, holdtime 90s, keepalive interval 30s                                                                                                                                                         
  Neighbor capabilities:                                                                                                                                                                                           
    Multiprotocol extensions: IPv4 unicast                                                                                                                                                                         
    Route Refresh                                                                                                                                                                                                  
    Graceful Restart: Timeout: 90, restarted, IPv4 unicast                                                                                                                                                         
    4-byte AS numbers                                                                                                                                                                                              
                                                                                                                                                                                                                   
  Message statistics:                                                                                                                                                                                              
                  Sent       Received                                                                                                                                                                              
  Opens                    3          3                                                                                                                                                                            
  Notifications            0          2                                                                                                                                                                            
  Updates                  3          6                                                                                                                                                                            
  Keepalives            1499       1499                                                                                                                                                                            
  Route Refresh            0          0                                                                                                                                                                            
  Total                 1505       1510                                                                                                                                                                            
                                                                                                                                                                                                                   
  Update statistics:                                                                                                                                                                                               
                  Sent       Received                                                                                                                                                                              
  Updates                  0          1                                                                                                                                                                            
  Withdraws                0          0                                                                                                                                                                            
  End-of-Rib               1          1                                                                                                                                                                            
                                                                                                                                                                                                                   
  Local host:         192.168.87.41, Local port:    179                                                                                                                                                            
  Remote host:        192.168.87.48, Remote port: 13528                                                                                                                                                            
                                                                                                                                                                                                                   
$

By the way, as you can see, bgpctl supports shortened commands, e.g. sh nei instead of show neighbor.

Now look for that VMs route:

desktop: bgpctl show rib

$ sudo bgpctl show rib
flags: * = Valid, > = Selected, I = via IBGP, A = Announced, S = Stale
origin: i = IGP, e = EGP, ? = Incomplete

flags destination          gateway          lpref   med aspath origin
*>    10.0.1.0/24          192.168.87.48      100     0 65002 i
$

So that VMs network, 10.0.1/24, it's there! Now check if the system routing table was updated and has this route:

desktop

$ route -n get 10.0.1.45   
   route to: 10.0.1.45
destination: 10.0.1.0                                                                                                                                                                                              
       mask: 255.255.255.0                                                                                                                                                                                         
    gateway: 192.168.87.48                                                                                                                                                                                         
        fib: 0                                                                                                                                                                                                     
  interface: re0                                                                                                                                                                                                   
      flags:                                                                                                                                                                               
 recvpipe  sendpipe  ssthresh  rtt,msec    mtu        weight    expire                                                                                                                                             
       0         0         0         0      1500         1         0                                                                                                                                               
$ ping -c 1 10.0.1.45                                                                                                                                                                     
PING 10.0.1.45 (10.0.1.45): 56 data bytes                                                                                                                                                                          
64 bytes from 10.0.1.45: icmp_seq=0 ttl=63 time=0.192 ms                                                                                                                                                           
                                                                                                                                                                                                                   
--- 10.0.1.45 ping statistics ---                                                                                                                                                                                  
1 packets transmitted, 1 packets received, 0.0% packet loss                                                                                                                                                        
round-trip min/avg/max/stddev = 0.192/0.192/0.192/0.000 ms                                                                                                                                                         
$

Whoa, things work as expected!

Conclusion

As mentioned already, similar result could be achieved without using BGP by using either static routes or bridging interfaces differently, but the purpose of this exercise is to get some basic hands-on experience with BGP. Right now I'm looking into extending my setup in order to try more complex BGP schema. I'm thinking about adding some software switches in front of my VMs or maybe adding a second VM host (if budget allows). You're welcome to comment if you have some ideas how to extend this setup for educational purposes in the context of BGP and networking.

As a side note, I really like openbgpd so far. Its configuration file format is clean and simple, documentation is good, error and information messages are clear, and CLI has intuitive syntax.

Saturday, December 16, 2017

Configuring macOS-like screenshotting in Openbox

For many years my way of taking screenshots was pretty trivial. I would execute something like sleep 5 && import -window root screenshot.png, switch over to the virtual desktop I want to screenshot and get this png file. If I need to have only some part of it, I'd cut it in GIMP.

A couple of years back when I've started using macOS at work, I googled up it screenshotting shortcuts. They seemed pretty weird, e.g. Command-Control-Shift-3, where 3 means entire screen and 4 means a user-selected region. While I don't know if there's some logic in choosing 3 and 4 for that (why not any other numbers?), I found that it's extremely convenient to take a screenshot of part of the screen and save it to a clipboard. Moreover, I found that I use this feature almost every day to capture parts of terminal window, highlighting some interesting bits from websites for posting on IM and other stuff where image is better than text.

Of course, when I'm running Openbox, using Gimp to achieve the same things starts feeling extremely cumbersome, so I decided to configure Openbox to have similar keybindings for taking screenshots.

First, I wrote a shell script to make things a little easier: screenshot.sh. It uses the import tool from ImageMagick and xclip.

It just accepts two options:

  • -r (stands for rootwindow) tells to capture entire screen, otherwise user has to select a region,
  • -f (stands for file) tells to save a screenshot to a file (name will be auto-generated and include date), otherwise saves a screenshot into a clipboard.

And, finally, keybindings configuration for ~/.config/openbox/rc.xml:

    <keybind key="A-S-3">
      <action name="execute">
        <execute>~/bin/screenshot.sh -r -f</execute>
      </action>
    </keybind>
    <keybind key="A-S-W-3">
      <action name="execute">
        <execute>~/bin/screenshot.sh -r</execute>
      </action>
    </keybind>
    <keybind key="A-S-4">
      <action name="execute">
        <execute>~/bin/screenshot.sh -f</execute>
      </action>
    </keybind>
    <keybind key="A-S-W-4">
      <action name="execute">
        <execute>~/bin/screenshot.sh</execute>
      </action>
    </keybind>

Help on Openbox keybindings configuration is here.

Saturday, November 11, 2017

The end of my Firefox story?

My history of using web browsers is not short, but not vast. I've started using Linux around 2000 IIRC, and my first DE was KDE and my first browser was Konqueror.

Here's how it looked (screenshot from Wikipedia):

As KDE was pretty resource heavy, and also building from source took a lot of time, I had started looking for a replacement. After trying out various DEs and WMs eventually I had moved to fluxbox and then to openbox a couple of years later. As I switched away from KDE, there was no reason to use Konqueror either, so I switched to Mozilla.

Back then it looked like this (screenshot from testingeducation.org):

Even at that time Mozilla was not on a light side. Also, in additional to browser, it included Mail and IRC client and some other stuff I forgot. Not quite unix-ish "Do One Thing and Do It Well", right?

Fortunately, in 2002 the first light-weight version of Mozilla became available; additional software like IRC and mail clients was ripped out, it was just a browser. Initially it was called Phoenix, then Firebird and finally Firefox. I was happy to see a project like that and switched to it pretty early (most probably while it was still called Firebird).

Fast forward to 2007 (or 2008). Co-worker showed me Vimperator. It seemed awkward initially, but after a little while I didn't want to switch back. Man, it get really addictive once you get used to it.

Eventually this firefox/vimperator combination became even more valuable to me. I spend probably 90% (or even more) of time either in a terminal or in a browser. Also, from time to time I use different computers with different OSes: FreeBSD, macOS, Windows, Linux. And firefox/vimperator allows to rapidly setup my development environment as it's available for all these OSes, and I just need to copy my tiny .vimepratorrc and that's it. Additionally, this convenient vi-like key binding system allows me not to care about OS-specific shortcuts (like switching/closing tabs, etc).

BTW, I recommend to take a look at MobaXterm if you're looking for a handy terminal emulator for Windows.

November, 2017. Situation with vimperator is not good. Firefox is switching to the new multiprocess architecture called e10s. Firefox 57 drops non-WebExtensions-based addons, with vimperaror being one of them. This is sad. I'm still using Firefox ESR while it's supported, but that won't last that long (image from https://www.mozilla.org/en-US/firefox/organizations/faq/):

Time to looks for alternatives. There ain't many.

As I'd love to keep my environment consistent across all OSes I use, I need cross-platform support. This doesn't work for most of the stand-alone browser projects like vimb and surf. However, qutebrowser does seem to provide binaries for many OSes. There are some obvious drawbacks of using tiny stand-alone browsers like that though, like no extensions (unless it supports some compatibility layer) and probably different level of stability on different OSes (depending on what core developers actively use), but I think it's worth checking out.

Another interesting option is Tridactyl which aims to provide WebExtensions based vimperator replacement. It looks like it's in beta stage right now, development is fairly active. Really hope that it'll be successful.

Sunday, August 6, 2017

Creating OpenBSD guest with libvirt/bhyve

I've been asked a couple of times how to setup OpenBSD guest with libvirt/bhyve. It's fairly straight-forward, but minimal libvirt version required for that is 3.5.0 because it's the first version that allows to specify vgaconf settings.

First, download the installation image: https://ftp.openbsd.org/pub/OpenBSD/6.1/amd64/install61.fs and create a disk image:

truncate -s 2G openbsd61.raw

Create an initial XML (pay attention to the vgaconf='off' bit):

Now with virsh do:

virsh # define /path/to/openbsd61.xml
Domain openbsd61 defined from /path/to/openbsd61.xml

virsh # start openbsd61
Domain openbsd61 started

virsh # vncdisplay openbsd61                                                                                                                                                                                       
127.0.0.1:0                                                                                                                                                                                                        

Using VNC client connect to the guest at the specified port:

vncviewer :0

This gives a boot loader prompt. For some reason, it doesn't set root device properly, so I have to do:

set device hd1a
boot

Then there'll be a number of installer questions (where I usually accept defaults) until it asks what disk should be used as a root device. It's important to check this carefully and choose the right one (you can find it by its size for example), otherwise it might just try to override the install image.

When the installation finishes, shutdown the guest, go back to virsh and edit the domain xml:

virsh # edit openbsd61

And remove the disk block corresponding to install61.fs. And then start domain again:

virsh # start openbsd61   
Domain openbsd61 started  

Now you should be able to connect to the guest via VNC or via SSH.

PS My sample xml uses the autoport feature that will be available only in libvirt 3.7.0. If you're using an earlier version, specify the VNC port explicitly:

<graphics type='vnc' port='5904'>

Sunday, May 21, 2017

Profiling OpenStack Horizon

OpenStack Horizon is a web based interface for managing OpenStack clouds. Just like many other OpenStack components, it's implemented in Python and uses the Django framework.

Sometimes you might notice that Horizon is sluggish and slow and it's not obvious what causes this. Natural thing to do in this case is to profile it to see problematic points.

There are at least two possible ways to profile that:

  • Use osprofiler, an "official" OpenStack Profiler,
  • Use standard Python profiling facilities like cProfile.

I recommend using the latter and I'll elaborate on that a little later.

Preparation

I think it's a good idea to profile Horizon in the same environment where you run your stage Horizon, i.e. pick one of the nodes where you have Horizon installed already (e.g. configured to be served using Apache) and bring your own instance of Horizon with the same configuration, but on a different port and using Django's built in http server.

For that purpose, you can copy over Horizon sources somewhere to your home directory (either an appropriate branch from git, or maybe grab sources from the package you use, that depends on your processes), copy over the existing config files (e.g. local_settings.py) and from top level source directory of horizon run:

~/horizon$ ./manage.py runserver 0.0.0.0:8000

This way your brand new Horizon instance will be available on port 8000. Also, you might want to check iptables configuration that it actually allows connections to this port.

Note: We're not using virtualenv because as we're running this on a Horizon node, we have all the dependencies installed via system packages.

Once this instance becomes accessible, we can start actual debugging.

Profiling

There's a wonderful Django Extensions package that makes Django profiling very easy. That could be installed via packages, e.g. on Ubuntu you can do:

#  apt-get install python-django-extensions

It could be installed using pip too in case your distro misses this package:

# pip install django-extensions

After installing the package, it's required to include it to the Horizon's INSTALLED_APPS list. While in the local copy of Horizon, open openstack_dashboard/settings.py, find INSTALLED_APPS and add 'django_extensions' to this list. The resulting setting should look something like this:

INSTALLED_APPS = [
    'openstack_dashboard',
    'sbr_reports',
    'sbr_log_processing',
    'django.contrib.contenttypes',
    'django.contrib.auth',
    'django.contrib.sessions',
    'django.contrib.messages',
    'django.contrib.staticfiles',
    'django.contrib.humanize',
    'django_pyscss',
    'openstack_dashboard.django_pyscss_fix',
    'compressor',
    'horizon',
    'openstack_auth',
    'django_extensions', #  for runprofileserver
]

Now it's possible to run the profile server. Terminate the old 'runserver' that was used to test basic configuration, create a directory for the profiling data and start the profiling server:

$ mkdir ~/horizon_profile_data_001
$ ./manage.py runprofileserver --use-cprofile --prof-path=/home/user/horizon_profile_data_001 0.0.0.0:8000

Note: looks like --prof-path doesn't decode "~", so have to pass the full path.

Now Horizon is running in profiling mode, so we can open it up in the browser and navigate to the problematic pages, for example "Admin -> System -> Networks".

Analyzing Results

If everything went file, in ~/horizon_profile_data_001 you'll see something like this:

~/horizon_profile_data_001$ ls |grep networks
admin.networks.001278ms.1495361937.prof
~/horizon_profile_data_001$

Now we can use the pstats module to analyze the results:

python -m pstats admin.networks.001278ms.1495361937.prof

This opens an interactive interface for exploring profiling data. If you're not familiar with that, a good start would be to do:
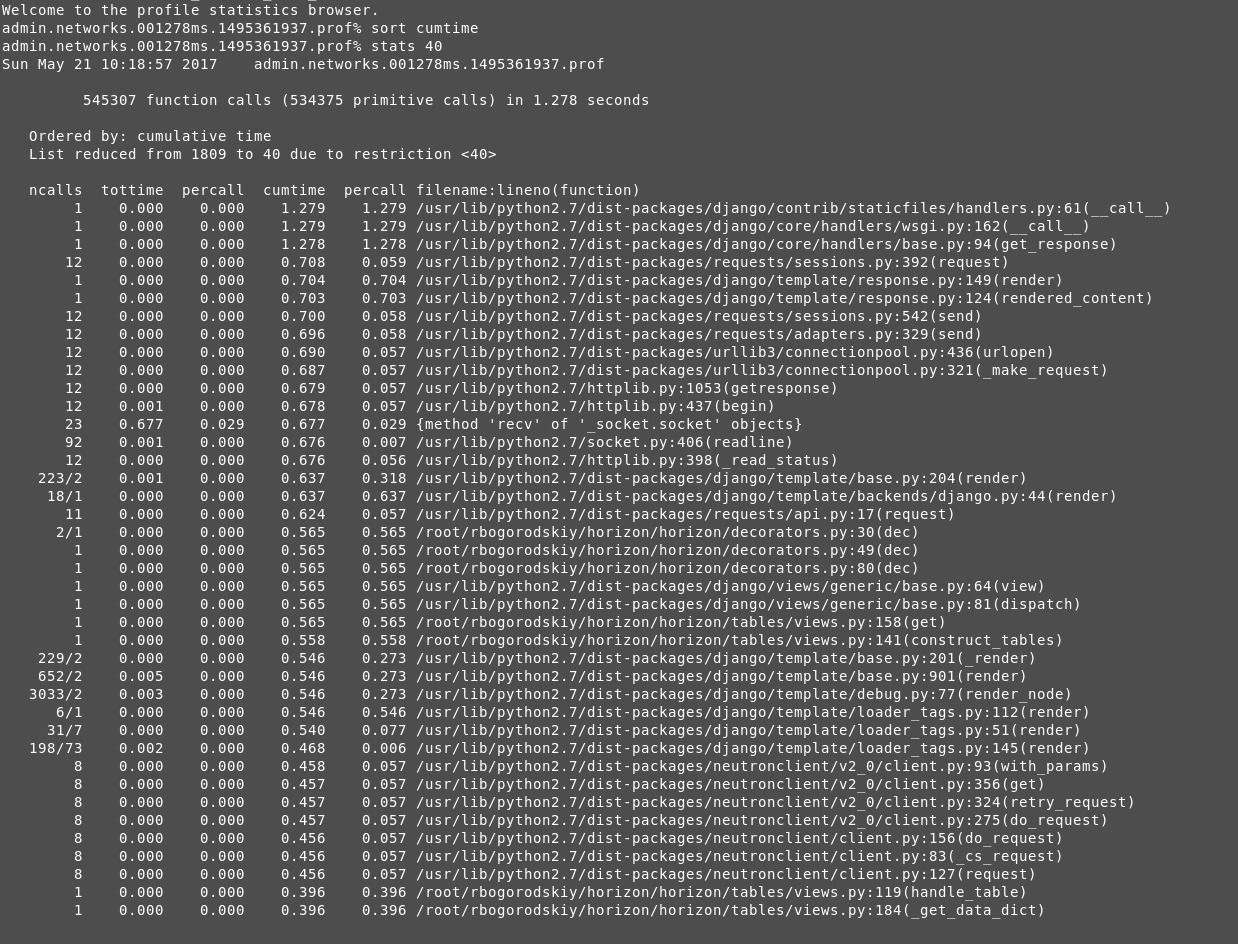
sort cumtime
stats 40

Here's how it looks for me:

Here you can get an idea how much time was spent in template rendering, Neutron client, etc.

Why not osprofiler

  • osprofiler only traces calls that were decorated with the profiler decorator (example). This means that if some function was not decorated, either intentionally or by mistake, you will not get details about it,
  • It uses JSON-formatted results, but I wasn't able to find a schema or documentation on it,
  • Its CLI is non-intuitive. Specifically, it provides osprofiler trace show command (as per docs), but there's no osprofiler trace list or other command to list traces,
  • It requires to have Mongo installation and therefore is harder to configure,

Also, the documentation stats that osprofiler is different from cProfile in a way that it skips random Python calls, however, it's not hard to strip those from the .prof file (but why would you need to do that though?), and it doesn't look like an advantage to me. Maybe it makes more sense for profiling components like Nova or Neutron though.

Further Reading

Saturday, April 1, 2017

Update on libvirt bhyve driver: UEFI support

New libvirt version 3.2.0 will be released really soon (maybe even before I publish this post), and I'm happy to announce that it brings UEFI support for the bhyve driver.

Specifically, starting with this version it's possible:

  • Point domains to the UEFI boot ROM to boot UEFI guests (instead of using grub-bhyve(1) for example)
  • Connect to guests through VNC (e.g. using vncviewer from net/tigervnc)
  • Use an USB tablet input device

I've updated the official documentation with description of these features and an example, scroll to Example config (Linux UEFI guest, VNC, tablet).

Gotchas: as you might now, bhyve's fbuf device accepts the vga option (e.g. vga=off etc), and different guest OSes might require different settings to make things work. It's not possible to change this using libvirt right now, so the default value (which is vga=io) is used, hence some guests will not work.

Kudos to Fabian Freyer for doing the majority of that work as a part of GSoC 2016.