Once in a while people on the #bhyve IRC channel on freenode ask questions about bhyve networking configuration, i.e. how to configure things to let a VM have network access.
There are at least 3 ways to do that (that I'm aware of, maybe there are more):
- Bridged networking
- NAT
- NIC Passthrough
I'll try to go over each of those and describe how things work in each scheme.
Common configuration
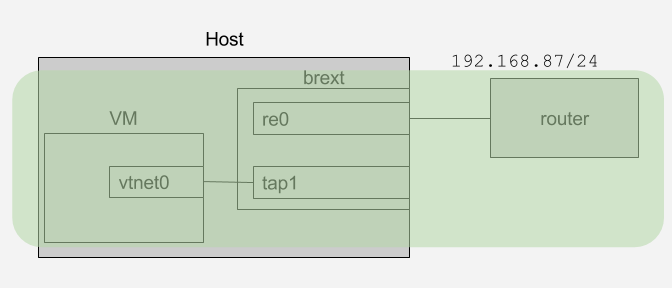
Common things for all the setups: I'm running FreeBSD 12-CURRENT amd64, I'm having two NICs (re0 and re1), both connected to a home router.
Bridged Networking
Bridged networking, just like name suggests, means bridging together VM interfaces and the uplink interface, putting those in the same L2 segment.
Configuration is relatively straight-forward. Let's start from a completely fresh configuration, where we don't even have re1 (uplink) configured:
kloomba# ifconfig re1
re1: flags=8802 metric 0 mtu 1500
        options=8209b
        ether 18:a6:f7:01:66:52
        nd6 options=29
        media: Ethernet autoselect (100baseTX )
        status: active
kloomba#
Now let's create a bridge named brextand add re1 to it. Also, we'll run dhclient on it to obtain an IP address (in my setup it comes from a DHCP server running on my home router):
kloomba# ifconfig bridge create name brext
kloomba# ifconfig brext addm re1
kloomba# ifconfig brext up
kloomba# ifconfig re1 up
kloomba# dhclient brext
As a result we have an IP address assigned to the brext bridge:
brext: flags=8843 metric 0 mtu 1500
        ether 02:29:bb:66:56:01
        inet 192.168.87.46 netmask 0xffffff00 broadcast 192.168.87.255
        nd6 options=1
        groups: bridge
        id 00:00:00:00:00:00 priority 32768 hellotime 2 fwddelay 15
        maxage 20 holdcnt 6 proto rstp maxaddr 2000 timeout 1200
        root id 00:00:00:00:00:00 priority 32768 ifcost 0 port 0
        member: re1 flags=143
                ifmaxaddr 0 port 2 priority 128 path cost 200000
Now we need to create a tap (that will be tap1 in my case) interface for VM and boot it up:
kloomba# ifconfig tap create up
kloomba# ifconfig brext addm tap1
And boot a VM like in a way you like, for example:
bhyve -c 2 -m 4G -w -H \
        -s 0,hostbridge \
        -s 3,ahci-cd,/home/novel/FreeBSD-11.0-CURRENT-amd64-20160217-r295683-disc1.iso \
        -s 5,virtio-net,tap1 \
        -s 29,fbuf,tcp=0.0.0.0:5900,w=800,h=600,wait \
        -s 30,xhci,tablet \
        -s 31,lpc -l com1,stdio \
        -l bootrom,/usr/local/share/uefi-firmware/BHYVE_UEFI.fd \
        vm0
Now we can open up a VNC client and connect to this VM (I use vncviewer :0) and do the following:
vm# dhclient vtnet0
If things go well, you'll get an IP address from the same subnet as IP address on host's re1 and, obviously, it's served by the same DHCP server that serves the host's re1.
### host ###
kloomba# ifconfig brext
brext: flags=8843 metric 0 mtu 1500
        ether 02:29:bb:66:56:01
        inet 192.168.87.46 netmask 0xffffff00 broadcast 192.168.87.255
        nd6 options=1
        groups: bridge
        id 00:00:00:00:00:00 priority 32768 hellotime 2 fwddelay 15
        maxage 20 holdcnt 6 proto rstp maxaddr 2000 timeout 1200
        root id 00:00:00:00:00:00 priority 32768 ifcost 0 port 0
        member: tap1 flags=143
                ifmaxaddr 0 port 10 priority 128 path cost 2000000
        member: re1 flags=143
                ifmaxaddr 0 port 2 priority 128 path cost 200000
kloomba#

### vm ###
root@vm0:~ # ifconfig vtnet0
vtnet0: flags=8943 metric 0 mtu 1500
        options=80028
        ether 00:a0:98:1b:c8:07
        inet 192.168.87.47 netmask 0xffffff00 broadcast 192.168.87.255
        nd6 options=29
        media: Ethernet 10Gbase-T
        status: active
root@vm0:~ #
To understand a little better what's going on here, let's run ping on a VM:
vm# ping 8.8.8.8
... and check how it looks like on the host:
kloomba# tcpdump -qni brext -c2 -e host 8.8.8.8
tcpdump: verbose output suppressed, use -v or -vv for full protocol decode
listening on brext, link-type EN10MB (Ethernet), capture size 65535 bytes
16:09:44.755083 00:a0:98:1b:c8:07 > 40:4a:03:76:de:1d, IPv4, length 98: 192.168.87.47 > 8.8.8.8: ICMP echo request, id 25603, seq 4, length 64
16:09:44.783499 40:4a:03:76:de:1d > 00:a0:98:1b:c8:07, IPv4, length 98: 8.8.8.8 > 192.168.87.47: ICMP echo reply, id 25603, seq 4, length 64
2 packets captured
6 packets received by filter
0 packets dropped by kernel
kloomba#
What we can see here? Packets from our VM are leaving the host with the IP address it has on vtnet0, MAC address is also vtnet0's MAC. BTW, 40:4a:03:76:de:1d is MAC of my router.
That is it, it works, does not need stuff like firewalls or routing configuration to work, so this approach is relatively easy. There are downsides of that, however. It's pretty common that the router your PC is connected to is configured to only pass only single MAC per networking port, or maybe even only a whitelisted MAC (that's quite common in office environments) or if your home router does not support that. In that case you'll have to go with the NAT approach that I'll describe next.
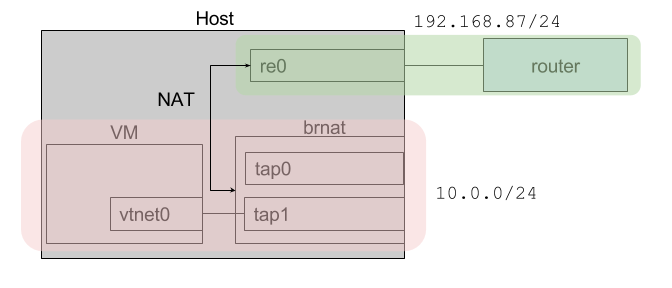
NAT Networking
Let's assume we're starting from scratch and don't have that brext bridge we created in the previous section. And we're again starting with creation of the new bridge:
kloomba# ifconfig bridge create name brnat up
kloomba# ifconfig tap create up
kloomba# ifconfig brnat addm tap1
brnat: flags=8843 metric 0 mtu 1500
        ether 02:29:bb:66:56:01
        nd6 options=1
        groups: bridge
        id 00:00:00:00:00:00 priority 32768 hellotime 2 fwddelay 15
        maxage 20 holdcnt 6 proto rstp maxaddr 2000 timeout 1200
        root id 00:00:00:00:00:00 priority 32768 ifcost 0 port 0
        member: tap1 flags=143
                ifmaxaddr 0 port 10 priority 128 path cost 55
kloomba#
As we can see, we no longer have our uplink interface re1 in the bridge. Now let's start a VM, command will be exactly the same as in the previous section, so I won't repeat it here.
Now, if we go to the VM and try to do dhclient vtnet0 nothing happens, because there are no DHCP server reachable from this VM. It's a good time to decide what IP range we'll use for our VM(s). Let's go with something like 10.0.0.0/24. Let's configure pf to do NATing for us. Basic /etc/pf.conf for this purpose might look like this:
ext_if="re1"

virt_net="10.0.0.0/24"

scrub all

nat on $ext_if from $virt_net to any -> ($ext_if)

pass log all
What we're doing here? For packets coming from $virt_net (our VMs range) we're translating its source address from 10.0.0.0/24 internal net to address of our external interface (re1). Now we can load the rules, enable pf and check if that works.
kloomba# pfctl -f /etc/pf.conf
kloomba# pfctl -e
pfctl: pf already enabled
kloomba#
We also need to assign a proper IP address to our bridge:
kloomba# ifconfig brnat inet 10.0.0.1/24
Also, it's a good time to ensure that IP forwarding is enabled on the host: sysctl net.inet.ip.forwarding=1.
Now VM is expected to get connectivity if we manually assign an IP address to it:
vm0# ifconfig vtnet0 inet 10.0.0.2/24 up
vm0# route add default 10.0.0.1
Now things should work and we can actually see what's going on with the packets. Let's start ping again in our VM: ping 8.8.8.8 and tcpdump on interfaces on the host. Let's start with brnat:
kloomba# tcpdump -ni brnat -c 2 -e host 8.8.8.8
tcpdump: verbose output suppressed, use -v or -vv for full protocol decode
listening on brnat, link-type EN10MB (Ethernet), capture size 65535 bytes
17:28:36.101514 00:a0:98:1b:c8:07 > 02:29:bb:66:56:01, ethertype IPv4 (0x0800), length 98: 10.0.0.2 > 8.8.8.8: ICMP echo request, id 21507, seq 62, length 64
17:28:36.129840 02:29:bb:66:56:01 > 00:a0:98:1b:c8:07, ethertype IPv4 (0x0800), length 98: 8.8.8.8 > 10.0.0.2: ICMP echo reply, id 21507, seq 62, length 64
2 packets captured
2 packets received by filter
0 packets dropped by kernel
kloomba#
And on our uplink interface re1:
kloomba# tcpdump -ni re1 -c 2 -e host 8.8.8.8
tcpdump: verbose output suppressed, use -v or -vv for full protocol decode
listening on re1, link-type EN10MB (Ethernet), capture size 65535 bytes
17:31:37.898499 18:a6:f7:01:66:52 > 40:4a:03:76:de:1d, ethertype IPv4 (0x0800), length 98: 192.168.87.44 > 8.8.8.8: ICMP echo request, id 19102, seq 236, length 64
17:31:37.926781 40:4a:03:76:de:1d > 18:a6:f7:01:66:52, ethertype IPv4 (0x0800), length 98: 8.8.8.8 > 192.168.87.44: ICMP echo reply, id 19102, seq 236, length 64
2 packets captured
3 packets received by filter
0 packets dropped by kernel
kloomba#
We can see that at this point no information about VM is exposed here (i.e. no VM subnet 10.0.0.0/24, no vtnet0 MACs etc); NAT works as expected.
As you can see, NAT networking is a little more complex configuration-wise. Though it's probably the most general solution, you don't have to rely on external routers configuration, bridging support in the hardware/drivers and so forth.
This configuration can be simplified though, a good step to it would be configuring DHCP server on brnat to serve IP addresses from our VM range. This could be done for example using the dns/dnsmasq tiny DHCP server.
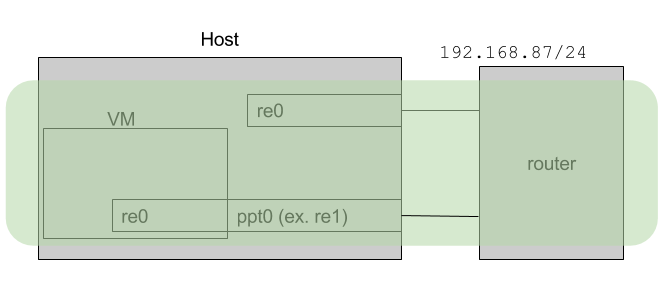
NIC Passthrough
This is a somewhat fun way to setup networking because a) you'll need 1 (one) physical NIC per VM b) you'll need one more physical NIC for host if you want it to keep connected. This might be much better with SR-IOV though I've never tried SR-IOV cards on FreeBSD. Anyway, back to the point.
I'm going to passthrough re1, I'm running pciconf -l -v to find its PCI address:
re1@pci0:3:0:0:        class=0x020000 card=0x85051043 chip=0x816810ec rev=0x09 hdr=0x00
    vendor     = 'Realtek Semiconductor Co., Ltd.'
    device     = 'RTL8111/8168/8411 PCI Express Gigabit Ethernet Controller'
    class      = network
    subclass   = ethernet
So I add pptdevs="3/0/0" to /boot/loader.conf and reboot. After reboot it looks this way:
ppt0@pci0:3:0:0:        class=0x020000 card=0x85051043 chip=0x816810ec rev=0x09 hdr=0x00
    vendor     = 'Realtek Semiconductor Co., Ltd.'
    device     = 'RTL8111/8168/8411 PCI Express Gigabit Ethernet Controller'
    class      = network
    subclass   = ethernet
Now starting a VM like this:
bhyve -c 2 -m 1G -w -H -S \
        -s 0,hostbridge \
        -s 4,ahci-hd,/home/novel/img/uefi_fbsd.raw \
        -s 6,passthru,3/0/0 \
        -s 29,fbuf,tcp=0.0.0.0:5900,w=800,h=600,wait \
        -s 30,xhci,tablet \
        -s 31,lpc -l com1,stdio \
        -l bootrom,/usr/local/share/uefi-firmware/BHYVE_UEFI.fd \
        vm0
If things go well (i.e.: host supports IOMMU, device supports passthrough, ...), we'll see this device in a VM exactly like it would appear in host:
re0@pci0:0:6:0: class=0x020000 card=0x85051043 chip=0x816810ec rev=0x09 hdr=0x00
    vendor     = 'Realtek Semiconductor Co., Ltd.'
    device     = 'RTL8111/8168/8411 PCI Express Gigabit Ethernet Controller'
    class      = network
    subclass   = ethernet
At this point it can be used just like it was not a VM but another host connected to a network with its own NIC. Once can run dhclient re0 etc.
Further reading
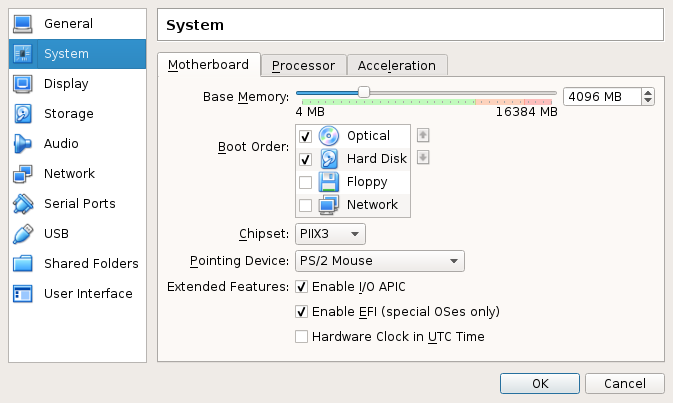
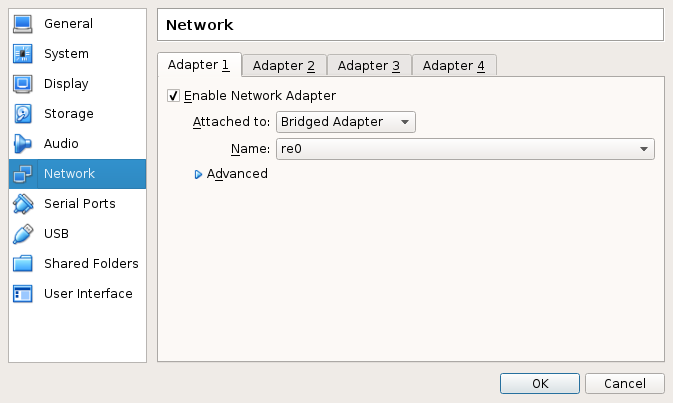
Update Oct, 17th, 2016: added pics.